Tuesday, November 12, 2013

Christmas in White

Time to create an all white card with the monthly theme from One Crazy Stamper of Christmas. I don't make all white cards very often, but when they turn out as well as this one did, I often think why not do this a lot more!


The card starts with a white card base layered with a front created by using a Sizzix embossing folder to create depth. Over that I have layered a white ribbon, and a Spellbinder die shape that features an all white Memory Box die called "Glowing Candles". The sentiment was stamped with Versa Mark embossing ink, then embossed with a white emboss powder, while the edges were lightly inked with a silver ink pad. Simple yet elegant!


Monday, November 11, 2013

Apple Blossom's Skates

Thanks for stopping here, our challenge for One Crazy Stamper this month is "Christmas" and these stamps I am using are so fun to color! 
The stamp is from Whimsy Stamps-Elisabeth Bell-Apple Blossom's Skates.  The pattern paper is BZ 6x6 pack Countdown to Christmas, used Xpressit Card Stock and Spellbinders, ribbon, twine, and Stamped sentiment is Whimsy Stamps-Seasonal Ornaments, and Whimsy Die.  Foam Squares, glue dots. Copic Markers-Y0000, C3, C1, C0, E11, E00, E31, E35, E04, YR20, T1, T6, T7, G99, YG97, R59, B0000, B93, B95, B99
Thanks again for stopping please play along with us and take in some retail therapy and stop at Lora's Store.  Till next Happy Crafty Crafting!

Sunday, November 10, 2013

Season's Greetings

Hi All;

The first week of November has been and gone, which means another week closer to Christmas. The stores have all their decorations out, Santa Claus parades are fast approaching, and the rush is on to find that perfect gift for our families and other important people in our lives.

For today's post for One Crazy Stamper, I have used this adorable stamp called Bluebell Behind Presents by
Wild Rose Studio.

Outside of Card

Inside of Card

Supplies used:  
There is still plenty of time to enter this month's Christmas challenge for a chance to win a prize pack from Wild Rose Studio.  New products are constantly arriving at Lora's store One Crazy Stamper which is great as there are more items to expand our creativity.

Until next week, keep crafting.


Saturday, November 9, 2013

Merry Christmas!!!

Hi Everyone;

It's Sue here filling in for Aaemie today at One Crazy Stamper.  As Christmas is fast approaching, six weeks next Wednesday I have used this adorable stamp Teddy Giving from Wild Rose Stamps.  I paper pieced the chair using paper from A Robin's Christmas (Wild Rose Studio) pack

Outside of Card
Inside of Card


Supplies used:
You have plenty of time to be creative and enter this month's Christmas challenge to win a prize pack from Wild Rose Studio.

Now is the time to make your Christmas wish list as new stock is arriving daily at Lora's store One Crazy Stamper (both Brick & Mortar and Online) stores.  Gift certificates are also a great idea.

I will be back tomorrow with another Christmas card.


Friday, November 8, 2013

Tutorial Time! Exploding Christmas Tree Box / Card

Hello and welcome to my exciting Friday Tutorial Post.  Today I would like to show you how to create an EXPLODING CHRISTMAS TREE BOX/CARD.  I am going to warn you that this post is very picture heavy but well worth the look.  Please take the time to read all the way through and let me know what you thing =)

If you have never heard of an exploding box/card you are in for a special treat.

Don't let the list of supplies needed to scare you off as most of the items listed are items you will already have in your craft tool box along with some special pieces that I used =)

Supplies Needed: 
* 2 pieces of matching 12x12 Bazzill Cardstock  (1 for the box at 12x12 and 1 for the lid at 6-1/8x6-1/8) 
* Paper Trimmer
* Scor-Pal 
* Scor-Tape 
* Squishy Scissors (+craft knife and ruler if desired) 
* 6" Circle Die Cutter (cut 1 using scrap from lid) 
* Scotch tape
* Dee's Distinctively Snow-covered Tree Die Large 
* 2 6x6 pieces of patterned paper to cut out your tree shapes from 
* 1 6x6 pieces of patterned paper for inside of the box and cut 4 squares at 3x3 each 
* Coordinating cardstock to mount your 3x3 patterned paper squares - cut 2 pieces at 3-1/2"x3-1/2" and cut 1 piece at 3-1/2"x7-1/2"
* High Hopes Stamps Sentiments: Holiday All Year & Magic of Christmas (you can use up to 3 sentiments on the inside if you wish depending on your patterned paper choice.  My paper allowed for 2 sentiments and with the last square I left it blank to put my "To & From" and special Christmas message for the recipient.
* Memento Ink:  Rhubarb Stalk
* Tape Runner
* Best Glue Ever! (love love love this glue!!)
* 1" Sheer Ribbon to wrap around the box and lid twice plus a little to decorate the top of the box as well
* Marianne Design Poinsettia Die
* Red & Green cardstock to make the Poinsettia
* Glue Dots
* 1 Yellow Gem (Rhinestone)
* Embellishments if desired for inside the box

So lets get started now that you have your supplies......

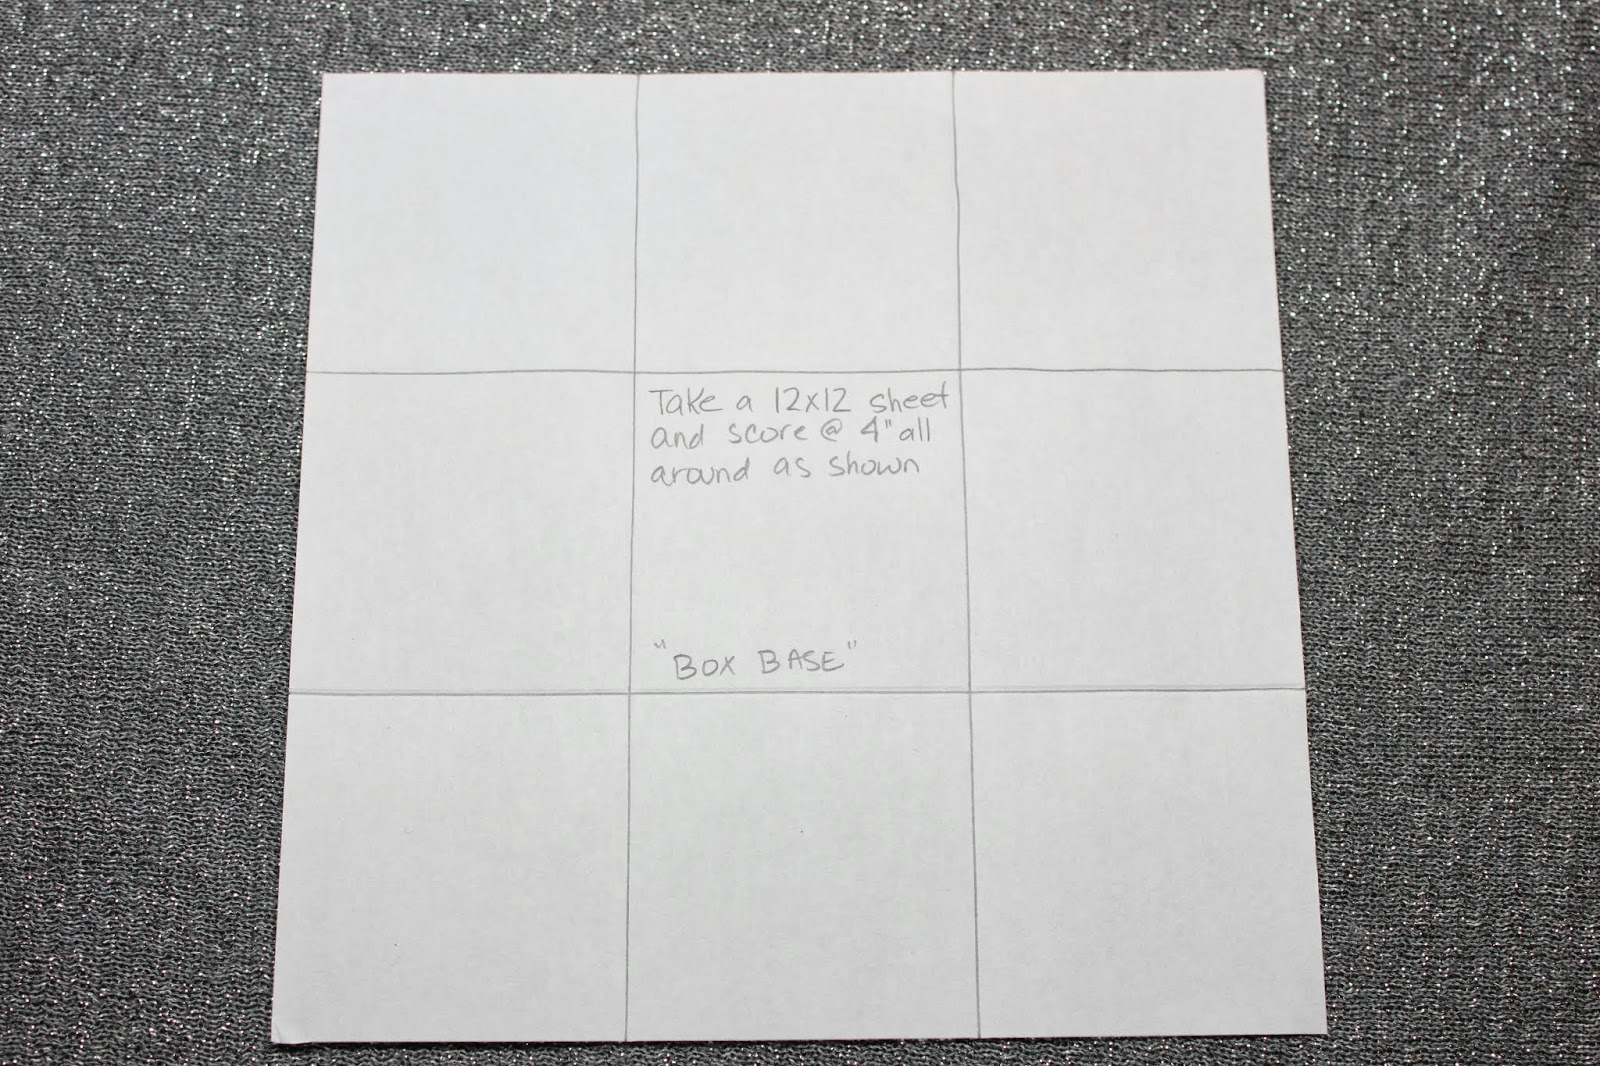
Step 1)  Build your Box Base:  Using your 12x12 cardstock piece and your Scor-Pal, score at 4" and 8".  Turn your paper once and score again at 4" and 8" again.  You should see 9 squares on your 12x12 cardstock - see photo below....

Step 2)  Cut out using either scissors or your craft knife and ruler, the 4 outside corners of your scored 12x12 cardstock - see photo below....

Step 3)  Build the Box Lid:  Using your 6-1/8"x6-1/8" cardstock and your Scor-Pal, score each side at 1" all around the square - see photo below....

Step 4)  On 2 ends of the scored 6-1/8"x6-1/8" cardstock, cut to the cross score lines, then score over.  Add Scor-Tape to the ends of the long cut areas and to the scored over short pieces at the bottom, this step will secure your lid - see photo below....

Here is a look at the completed lid (upside down)....

Step 5)  Making your tree:  Take your 6" circle and fold in half.  Cut along the folded line with either your paper trimmer or scissors so that you have a half circle.  Then take your half circle and form into a cone and secure with Scotch tape - see photo below....

Step 6)  Using your 4 sets of Dee's Distinctively Snow-covered Tree, starting with the larges pieces of the cut outs put tape runner or Best Glue Ever! on the backside and stick evenly around the bottom of the cone.  Be sure to have some of the tree "boughs" extend past the cone as this will be how you will stick your tree to your box.  Continue this step with each layer of the tree till you reach the top - see photo below with the die, patterned paper I used and also the covered cone (tree)....

Here is a closer look at the completed tree....
 
Step 7)  Decorating the outside of the box & lid:  Attach ribbon to the box on the outside and secure on the inside with Scotch tape.  Be sure to match up the ribbon lines on both the lid and box so that when the box is assembled it looks like the ribbon is all in a line and has a "wrapped" look.  The reason this step is completed now is so that when you complete the inside of the box your 3x3 mounted squares will cover up the ends of the ribbon and Scotch tape.
 
Step 8)  Poinsettia:  Cut and create your poinsettia for the top of the lid.  I used glue dots to layer the petals of the flower then I added a gem to the center of the flower.  Add Ribbon strips or loops to decorate under the flower if desired and attach to the top of the lid using Best Glue Ever! - see photos below of the top view....

Side view of the Poinsettia....

 
Step 9)   Decorating the inside of the box:  Stamp all your sentiments on your decorative 3x3 paper as desired - see photo below....

Step 10)  Attach the 3x3 squares to the mounting cardstock - see photo below....

Step 11)  Attach the mounting cardstock with your decorative paper to the back part of the inside of the box.  I decided to create a "wall" for my box, then attach the two remaining squares to the inside of the box - see photo below....

Step 12)  Attach the tree to the center of the box base:  Using Best Glue Ever! put glue to the rim of the cone inside the tree and on the over hanging boughs of the tree and attach to the center of the box base.  Embellish the base around the tree if desired with presents, snowflakes, etc.

And here is your Exploding Christmas Tree Box/Card all wrapped up to give away....

See completed project below....

Thank you for sticking with me till the end and I hope that you enjoyed today's tutorial and will give it a try. I would love to hear what you thought of this project!

Until Next Time, Keep Crafting & Merry Christmas!
Hugs;
 

Thursday, November 7, 2013

Christmas Card!!

This is my first post this month..I choose Santa's Glee from Whismy Collection..It is that time of the year when we all make our Christmas Lists and yes some of us do have to check them twice!! LOL..I stamped the image with Memento Tuxedo Black Ink on White Card Stock..I coloured Santa with COPICS and shaded with PRISMA PENCILS…The pattern paper is from BAZZILL paper pack called BELIEVE..Now it is hard to see but the sparkle on his coat,pants and hat are Frosted Lace Stickles and then Glamour Dust on top.. All of the supplies I have listed above can be found atONE CRAZY STAMPER and please join us for the CHALLENGE..theme is CHRISTMAS..take a peek lower and I will list my Colours..take care and be safe thks for stopping by..NOW GO SHOP!!!lol

COLOURS OF COPICS USED

E 02, 00, 000
R 29, 27, 24, 22
C 00, 0, 01, 3, 5
Y 15, 17, 38
E 40, 41, 42, 43

PRISMA PENCILS USED

1095 Black Raspberry
925 Crimson Lake
943 Burnt Ochre
935 Black
1074 70% French Grey
1076 90% French Grey
947 Dark Umber
1033 Mineral Orange


Wednesday, November 6, 2013

Sending Christmas Cheer!

Good Morning.  Another Wednesday has rolled around and I have a card to show you today using our challenge theme this month of "CHRISTMAS".  I can never seem to make enough Christmas cards as they are my favourite kind to make.  I have used a stamp and matching paper by Wild Rose Studio.


Supplies: Copic Xpress It Blending Card Stock, Memento Tuxedo Black Ink, Wild Rose Studio "Bella with Gifts", Copic Markers, Wild Rose Studio Xmas Bella Paper, Your Next Stamp "Fishtail Banner Die Set", Gold and Crystal Stickles, Sakura Clear Glaze Pen, DecoArt Snow Tex.

A close up of Bella:


Copics Used:  Elephant ~ R20, R22, R24, W1, W3, W5, W7; Santa Hat ~ R24, R37, R39, R89; Presents ~ 0, B000, BV00, BV02, BV04, G21, G24, G29, R22, R24, R29, R37, R39, R89; Sky ~ B23, B24, B26

Glad you could come by today.  Don't forget to enter our CHRISTMAS challenge this month for your chance to win two stamps from Wild Rose Studio.

Have a GREAT Wednesday!

Hugs,

Tuesday, November 5, 2013

A Cup of Love

The colder weather is definitely here now, with probably more on the way, and today's project for One Crazy Stamper would be an ideal gift for someone special.


I have colored up the High Hopes image "Snowy's Cup" with my Copics, then fussy cut the image and placed it on a little gift bag that I created using my Scor-pal. I used the Martha Stewart Snowflake border punch as a decoration around the base of the bag, and added touches of glittler with a Sakura Clear Star pen, and red berries with a Viva Decor Pearl Pen. The bag is full of hot chocolate mix and a couple of cinnamon sticks to add some extra flavor. The sentiment "Cup of Cocoa" is the perfecrt way to present this gift!

Please check out the rest of the One Crazy Stamper design teams wonderful projects for this month's theme of Christmas, and then enter your project for a chance to win!


Monday, November 4, 2013

Christmas One Crazy Stamper

Hello crafting friends, thanks for stopping, I can't believe it is November already, I best get my Christmas Cards going.  Today my card is for the fun month long challenge at One Crazy Stamper which is "Christmas".  Works wonderful for me. 
I am using the Whimsy Stamp called Vintage Christmas, I cut out the poinsettias and used 3D foam squares to pop them up.  The Die behind them is from Memory Box called Whimsy Circle, I used my new Spellbinder Labels 21, Embossing Folder - Kassie's Brocade.  I added some ribbon and I used a punch with the sentiment from the same stamp set. Glue Dots, and BZ White cardstock, Black Versafine Ink, Xpressit Cardstock, Copic Markers-R83, R85,  R89, YG91, YG93, YG95, YR21.
Thanks again for stopping please go over to One Crazy Stamper have some fun, share the love, great prizes also, and we love see you there.  Take is some shopping a Lora's store and till next time Happy Crafting!

Sunday, November 3, 2013

October Challenge Winner

Hi Everyone!!! Sorry for the delay in posting the October Challenge Winner!!! We do have a winner which was picked by Random.org and it is: Lucy Patrick - #61 Lucy please email lora@onecrazystamper.com with your info so she can get your prize mailed off to you. Thank you for all who played in last month's Challenge. Please be sure to check out our November "Christmas" Challenge!! Have a wonderful day! Cheers, Lora