Sunday, May 31, 2015

May Challenge Winner

Thanks for joining in our challenge this month. We had fun looking at all the fabulous entries!  We used random.org to choose the winner.

This month's winner will be sent 2 High Hopes Rubber Stamps and the winner is:

#31 D ~ Designs by Dragonfly

for her Birthday card -- Kitty in a bag


 D please email lora at onecrazystamper dot com to claim your prize.

Check back tomorrow for our new monthly challenge and another chance to win!

Saturday, May 30, 2015

Time To Celebrate!

Hi Everyone!

It's Saturday so that means you get to see what I have created for this week's blog post! This week I am using the Art Impressions new Girlfriend Cheer Set! I am in love with all the Girlfriends from Ai. They always make me giggle and put a smile on my face!


For this card I paper pieced all the girl's tops with paper from the Echo Park Bundle Of Joy- New Addition 6x6 designer paper pad. I used my concave corner punch on my stamped image and layered cardstock. I also inked the edges of all the papers with Tim Holtz Distress Ink in Victorian Velvet. I love this technique as it helps to make your paper pop! On the pom poms I added Crystal Stickles for some added interest.


I always like to add some sort of die cuts as well as a sentiment on the inside of my cards. It just makes me feel like the project is complete! This Cheer set comes with 3 sentiments and I used them all on this project.


Copics Used:
Skin: E00, E02, R20, RV17
Hair: Y21, YR23, E15 / E23, E25, E29 / T0, T1, T3, T5
Green items: G21, G24, G40
Grey items: T0, T1, T3
Pink items: R81, R83, R85
Blue items: BG000, BG01
Ground and outline: T0, T1, BG000

 I hope you have a wonderful weekend! See you next week.
Happy Crafting! 
Supplies:

Friday, May 29, 2015

High Hopes Stamps New Release - Drew Loves to Fish

Hello and Happy Friday!  Today I have a cute card to show you that I made using another New Release from High Hopes Stamps....
 Supplies Used:
* Image:  High Hopes Stamps, Drew Loves to Fish
* Copic Xpress It Cardstock
* Copic Sketch Markers
* Memento Ink:  Tuxedo Black
* Paper:  Lost & Found 6x6 Christmas
* Your Next Stamp Gumdrops, Chocolate & Holly
(All products listed above can be purchased at www.onecrazystamper.com)

Here is a close up of the adorable image to see the Copic colours used....
 Copic Colours Used:
* Skin:  E11, E00, E000
* Hair:  W9, W7, W5
* Coat:  E47, E44, E43, E42
* Fur, Mitts & Boots:  E43, E42, E41, E40
* Penguin:  W9, W7, W5, W1, W00, YR14, YR12
* Hat & Scarf:  R39, R37, R35, C3, C1, C00
* Fishing Pole:  W7, W5
* Fish:  BG99, BG96, BG93
* Bag:  E43, E42, E42, E41, E40, E49, E47, E44
* Cans:  C3, C1, C00
* Snow & Ice:  BG11, BG000, BG0000, 0
* Sky:  B01, B00, B000, B0000, 0

I hope that you enjoyed today`s card, remember that it is never to early to start your Winter and Holiday card!

 
Until Next Time, Keep Crafting!
Hugs;


Thursday, May 28, 2015

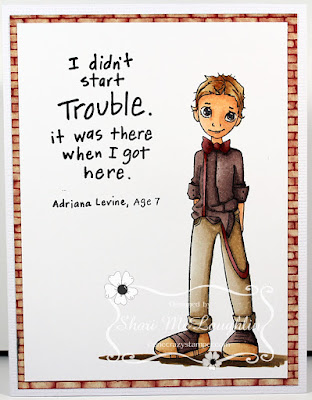
Trouble Starter

The last Thursday of the month is here already, so that means it's time to showcase another card for One Crazy Stamper.  I have gone back to one of my favorite color combos - all E Copic colors were used in the creation of this card.

 
This is Suspenders from Saturated Canary available here. 
Card Recipe
Pants - E40, E42, E43, E44
Skin - E01, E11, E21, E00
Suspenders/Bow Tie - E04, E08, E09
Shirt, Middle of Shoes, Eyes - E71, E74, E79
Hair - E30, E33, E35
Ground - E44
 
There is still a couple of days left to enter the challenge at One Crazy Stamper to win a fabulous prize so for more details check it out here.


Wednesday, May 27, 2015

Perfect Chemistry -- One Crazy Stamper

Hi there, Its Nat here and I'm back with one more fun scene using Your Next Stamp Perfect Chemistry Die YSND192 and Stamp CYNS164 set.
I actually brought this stamp set into work and asked the Gals for their suggestions. I have to say they had some great ideas and I think we all had fun dreaming up different scenes. So compliments of my Co-Worker (Miss Fiona) and her fun imagination I created this Mad Scientist/Back to the Future type character playing in the rain!
I used an old typewriter to create the sentiment "Your Electrifying"  and also added a kite as he kinda reminds me of another Scientist by the name of Ben...Franklin of course :)
Way too much fun!
Thanks for peeking in, I hope you get your  imagination working with this fun set!
Coloured with Copics and Airbrushed Background using ..
YG00,YG01,YG03,YG05,Y26,C1,C5,C3,C7,BV25,B91,B93,BG15,E31,E33,E50,
TR00,YR02,YR04
 

Wings of Hope!

Hi Fellow Crafters;

Wednesday is here again, which means hump day as well as this month is almost over.  Where oh where is the time going.  Besides having a new challenge on Monday as it is June 1st, school is almost out for the summer and a big move for my work which is an academic library will be over by mid June.  Yeah! Can't wait for that to happen, moving houses is definitely a lot easier.  As my camera is having issues (the auto focus isn't working properly), a thank you goes to my daughter-in-law Amanda for taking this photo with her iPhone

For my post today, I have used the Birds & Blooms, Leafy Branches stamps and co-ordinating dies both from Heartfelt Creations.  I used this specific piece of design paper for the wording on it.  It is the Butterfly Medley Collection also from Heartfelt Creations.  I added the small double dot jewels to the centers of the flowers.


Supplies used:
There are still a few more days to enter this month's challenge.  For any supplies that you might need check out both Lora's OCS online and brick & mortar stores.  Both the products and prices are amazing.

Until next time, happy crafting and enjoy the time with your families.

Hugs,


Tuesday, May 26, 2015

Ombre Paper Flower Tutorial

Hey there my fellow crafty peeps, I've got a neat tutorial to show you today. I'll be making a paper flower out of watercolour paper and then I have a little video to show you how to do an ombre look on the petals.

So lets get started.

 These are some supplies I'll be using, a glue gun would work great(but I don't have one...I know, I know I can't believe it either). 

4''x3'' pieces of coldpress watercolour paper. 

This is how I created the ombre look for the petals.

You'll need to make large enough slits in the petals so the stem can fit through.

I used flower stem tape, wire stems and some stems I had from a faux flower bouquet. Or if you have the ones on the far left, they are awesome too.

I hooked the wire through the trinket and twisted the end to secure it, then I twisted the wire around the stem. 

To get a realistic looking petal, bend and roll it around a bit and it will to give them their lovely shape. After the first three petals are in position, add glue to secure and continue adding more petals in a staggered pattern. 

Once your flower is complete, wrap the stem with some stem tape for a finished look. 

The result...a beautiful paper flower!

Hope you enjoyed my tutorial, have a super awesome crafty day!


Monday, May 25, 2015

Happy Birthday Little Miss Muffet

Thanks friends for stopping, wow what a wonderful month full of great creations.  I am talking about the challenge here at One Crazy Stamper.  You still have a little bit more time to enter your project.  Share the love with the talent design team as well.  Lora has a great array of supplies in her store so make sure you pop on over there as well.
For my card today, I am using the super cute stamp from Little Miss Muffet, called Polka Dots Pals Daisy.  I had so much fun with this card.  Adding extra balloons and a gift bag as well using this fun paper from Taylored Expressions Double the Fun, my friend gave me, so bright and fun.  I colored my little friend using Copic Markers-C2, C4, C5, C10, YG05, YG25, BV17, BV08, BV13, Y08, RV91, RV93, RV17, RV19, E50, E53, E43, E41, E40, 0.  Look forward to seeing your creations here at One Crazy Stamper, till next happy crafting.


Saturday, May 23, 2015

My Bestie Fabby!

Happy Saturday!

 Look at this super cute My Bestie called Fancy Pants Fabby! I just want to squeeze her little cheeks! And her puppy..... pure cuteness! What an adorable stamp set!


I stamped and coloured up Fabby with my Copic markers and then fussy cut out the image. I added a doily, metal embellishment and some lace with ribbon threaded through on top of my design paper that is layered with matching cardstock. I also inked all the edges of my paper and doily with Tim Holtz Distress ink in Vintage Photo to add some dimension to my card.


I used the High Hopes sentiment stamp "Smiling" (#H262) on the inside of my cards as well as a MFT mini double dot border die cut.


It's hard to see but Fabby's bows, leggings and puppy's bow all have clear glitter Wink of Stella added to them.

Copics Used:
Skin: E00, E11, R20, RV25
Hair: E21, E25, E29
Pink items: R81, R83, R85, R89
Yellow items: Y0000, Y00, Y11
Dog: C1, C2, C3, C8
Ground: W0, W1
Outline: G0000

You still have time to enter into our May Challenge "Anything Goes". The weekend is the perfect time to get crafty, so I'll look forward to seeing what you enter!

Happy Crafting

Supplies: