Showing posts with label Art Impressions. Show all posts

Thursday, June 2, 2016

Cat Lady Try-fold card

Well it certainly feels like summer now that we're in the month of June... did you happen to see our new OCS June challenge that was posted yesterday?  If not, scroll down and you can see all of the inspiration brought to you by the entire OCS Design Team.  I am using the fun Cat Lady Try-fold set by Art Impressions today.

I adore colouring with Copic markers, so Try-folds are perfect cards for me, as that's pretty much all there is to it!  I've got a few pictures to show how each of the panels look:


 All of the cutting/scoring/stamping instructions are included with the stamp set, so assembly is quick & easy.  You'll notice that I add patterned paper to the back of each flap, to hide the slight bleed through by the Copics.  Lora has quite a selection of Art Impressions stamps in the One Crazy Stamper store, you can find them all here.
Onyx Black Ink by Versafine

Wednesday, March 30, 2016

What Diet?

Howdy!
Happy Wednesday everyone! It's my turn today to share a card with you! For my post today I'm using the Art Impressions "One 2 Brag set".
OMGeeee! This sentiment just makes me burst out laughing and lately is so true LOL! I chose papers from the Authentique "Infused" 6x6 collection and all the cakes and cupcakes go perfectly with this stamp!
Inside view using a stamp from Amy R!
Copics Used:
Skin: E00, E11, R20, R27(lipstick & earrings)
Hair: E43, E44, E47
Cake: Y32, E59
Pants: T1
Shoes: T1, T3, T5
Plate & fork: T3

Head on over to One Crazy Stamper's Online store and see all the goodies Lora has for you to chose from!

Happy Crafting!

Supplies:

Wednesday, March 23, 2016

Easter Treats!

It's Wednesday!
Wednesday means that I get to share with you a project I made for my Design Team post! I am using the Art Impressions stamp set called "Hoppy Easter". This set contains 6 images and 3 sentiments! Great versatility and value for your money!
So I decided to make this super cute little candy or egg holder and matching 3x3 mini card. The box design is from The Silhouette Store. I popped up all the images and added one to each side of the box. 
Copics used:
Bunnies: E31, E33, E35, R20
Chick: Y13, Y15, Y17, YR02, YR04
Eggs & Jackets: Y11, Y13, Y15/ R81, R83, R85/ V22, V25, V28/ YG03, YG05, YG07/ B01, B02, B04
Pants: T0, T1
Here you can see a closeup of all the images.

Don't forget to enter into the Challenge for March. The theme is "Anything Goes". Create something fabulous and enter to win!

Lora had this adorable set up for pre-order....hope you got one for your collection!


Happy Crafting!
Supplies:


Wednesday, March 2, 2016

Slider Die Tutorial

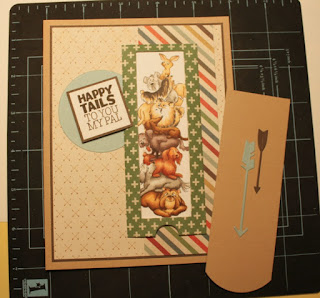
Hello everyone!  I have a card and step by step instructions to show you how to make a slider card using the new Slider Die and Stackers stamps from Art Impressions.  Here is what the card looks like when the recipient receives it:
 Then you pull down the tab.....
 And hiding underneath is the Dog Stackers stamped image:
I had a great time colouring this with my Copics - I had to figure out each breed as I went along (it's pretty obvious here, but when it's just in black and white, it's not so easy!)  I actually Googled "Pomeranian" so that I'd know how to colour him up!  Here's how I put my card together:
 The slider measures 2" x 5" assembled, and I chose to cut mine out of patterned paper.  I cut my rectangle with the Dog Stackers image to be a little smaller, so that it would fit underneath (it's 1 3/4" x 4 5/8").
 I assembled my card base, and folded the edges of the die cut, ready to glue it down.
 I made my pull tab out of the same cardstock as my base, it measures 1 3/4" x 5 1/4".  I used a circle die to round off the end, stapled on a bit of ribbon to make it easy to pull, and added a couple of Spellbinder's arrow die cuts to indicate that the recipient should pull it down.
 I glued down the top edge of my diecut, then made sure the puppies were centered underneath, and glued them both down.  I positioned the blue circle under the image, as I knew how I wanted the sentiment to sit on the finished card.
And there you have a seriously cute card for the dog lovers in your life.  *There are five different Stacker stamps (Elephants, ducks, cats, dogs & turtles) each come with a sentiment, and the die is sold separately.  You could easily use the stamps on their own without the die, but the die could have SO many other uses.  How about using it sideways with a message on the pull tab, and another message hidden underneath?  (Like a joke & a punch line?)  Or you could use any stamp that fits as the hidden image.  I've also seen the pull tab done with a small circle cut out at the top - so that just the Chiuaua would be peeking out.  Grab the die while you can, and I'd love to see what you come up with! (*Note that the die & stamps are still on preorder at the time the post went live - I will update the link when they're in the store!)
Products found in the One Crazy Stamper Store:  Dog Stackers from Art Impressions
Slider Die from Art Impressions

Wednesday, February 17, 2016

Quilting Sisters

Hi!
Today I wanted to share with you a card I made using a stamps set from Art Impressions Girlfriends line called "Quilt Set"! This is another favourite of mine! I just love how the Girlfriends are all wrapped in the quilt! They are surrounded by love and friendship!
I am using paper from the Kaiserkraft  Shine Bright 6x6 collection. I decided to paper piece the quilt and then I coloured in the hearts and the blanket age with my Copic N9. A few YNS Gumdrops and some ribbon with a bow finished things off!
I stamped the sentiments that came with the set and then cut them apart and adhered them to these cute tags!
Copics Used:
Skin: E00, E11, R20, RV17
Hair: E43, E44, E47/ Y21, YR21, YR23
Hearts and blanket edge: N9
Pants & Shoes: N1, N2, N3/ N3, N5, N7/ Y23, Y28

Don't forget to play along with us in our February Challenge called "Anything Goes"! Head on over to the OCS blog for all the details and to link up your creations! Good luck, and have fun being creative!
Supplies: