Showing posts with label Echo Park Paper. Show all posts

Wednesday, March 2, 2016

Slider Die Tutorial

Hello everyone!  I have a card and step by step instructions to show you how to make a slider card using the new Slider Die and Stackers stamps from Art Impressions.  Here is what the card looks like when the recipient receives it:
 Then you pull down the tab.....
 And hiding underneath is the Dog Stackers stamped image:
I had a great time colouring this with my Copics - I had to figure out each breed as I went along (it's pretty obvious here, but when it's just in black and white, it's not so easy!)  I actually Googled "Pomeranian" so that I'd know how to colour him up!  Here's how I put my card together:
 The slider measures 2" x 5" assembled, and I chose to cut mine out of patterned paper.  I cut my rectangle with the Dog Stackers image to be a little smaller, so that it would fit underneath (it's 1 3/4" x 4 5/8").
 I assembled my card base, and folded the edges of the die cut, ready to glue it down.
 I made my pull tab out of the same cardstock as my base, it measures 1 3/4" x 5 1/4".  I used a circle die to round off the end, stapled on a bit of ribbon to make it easy to pull, and added a couple of Spellbinder's arrow die cuts to indicate that the recipient should pull it down.
 I glued down the top edge of my diecut, then made sure the puppies were centered underneath, and glued them both down.  I positioned the blue circle under the image, as I knew how I wanted the sentiment to sit on the finished card.
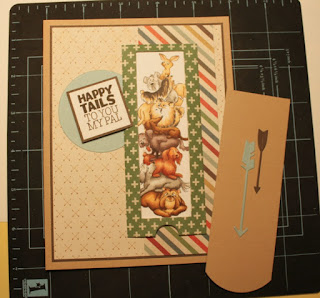
And there you have a seriously cute card for the dog lovers in your life.  *There are five different Stacker stamps (Elephants, ducks, cats, dogs & turtles) each come with a sentiment, and the die is sold separately.  You could easily use the stamps on their own without the die, but the die could have SO many other uses.  How about using it sideways with a message on the pull tab, and another message hidden underneath?  (Like a joke & a punch line?)  Or you could use any stamp that fits as the hidden image.  I've also seen the pull tab done with a small circle cut out at the top - so that just the Chiuaua would be peeking out.  Grab the die while you can, and I'd love to see what you come up with! (*Note that the die & stamps are still on preorder at the time the post went live - I will update the link when they're in the store!)
Products found in the One Crazy Stamper Store:  Dog Stackers from Art Impressions
Slider Die from Art Impressions

Wednesday, August 28, 2013

A Mini Album/Book Card Tutorial

Good Morning.  As I told you last week, I have a tutorial for you today on how to make a mini album/book card.  This versatile little card/album has many uses ~ a card with wishes on each page, a mini album with pictures on each page and tag, a journalling book on a layout ~ and I will show you how I used mine at the end of the post.  There will be lots and lots of pictures and instruction and if you still have questions. just leave me a comment here or on my personal blog and I will answer.

The first thing you need to make this album is a single piece of 12" x 12" card stock.  This will be your base.

Step 1 ~ Using a scoreboard, score at 2", 6" and 10".


Step 2 ~ Rotate the page and then score at 3", 6" and 9".


Step 3 ~ Fold along all score lines, making the 2" folds into pockets.


Step 4 ~ Cut along middle score line, leaving 3" together.


Step 5 ~ Add score tape to the back of the page that is not cut.  Put this page together.  Next, accordion pleat the other pages to make a book.  Add score tape to the back of these pages to hold together.  Also, add score tape to the open ends of the pockets.


Step 6 ~ Cut tags for the pockets.  Embellish album and tags as desired.  Tie the album closed with a ribbon.


The white and kraft albums were just to show you the steps. Here is a picture of my finished album:


And this is how I used it:


Left side:


Right side:


I used it for a journalling box for a layout.  I have missed scrap booking as I have been making so many cards so I went back to my first love of paper crafting and made a scrap book page.  In keeping with the theme of the month "BIRTHDAYS" this layout showcases my 50th birthday.  I am still looking for a catchy title so if you can think of one, please leave it for me in the comment section.  


Thanks for coming by today.  I hope you enjoyed my tutorial and will try one of these cute little mini albums to send as a card or use for your scrap booking.  Remember, there are just a few more days to enter our challenge for this month "BIRTHDAYS" as we will have a new challenge up on September 1.

Hugs,


Wednesday, August 21, 2013

Thank U

Hello.  Well another Wednesday has rolled around and it is my turn to show you a project here on the One Crazy Stamper blog.  I was asked to make a card for someone to give to their little girl's baseball coach at the end of the season.  She wanted it both girly and sporty and I think this fit the bill.


Supplies Used:  Copic Xpress It Blending Card StockMemento Tuxedo Black InkSaturated Canary "Lil Pitcher", Copic MarkersEcho Park Here and Now 6" x 6" PadGlossy Accents

A close up of the image:


Copics Used:  Skin ~ E00, E02, E11, R20; Hair ~ E35, Y21, YR23; Clothes ~ E40, E42, E43, R81, R83, R85, R56; Shoes ~ W3, W5, W7; Pitcher's Mound ~ E33, E35, E37; Grass ~ G21, G24, G29

Thanks for coming by today.  You still have a couple of weeks to join us for our "BIRTHDAY" celebration and you could be a guest designer with us.  Please come back every day to see what my amazing design team sisters have created!  Join me next week as I will have a tutorial for you.  And, coming up, we are going to have a blog hop showcasing new Christmas stamps from High Hopes complete with prizes.

Have a wonderful day.

Hugs,


Tuesday, August 20, 2013

Happy, Happy Hippo

Today's Birthday themed card for the monthly challenge at One Crazy Stamper is a clean and simple design!

The card base is just a piece of yellow cardstock with a layer of dp from Echo Park Paper's Beautiful Life collection, and finished with a piece of white cardstock embossed with an older Cuttlebug folder. A simple piece of ribbon was wrapped around the embossed paper before it was adhered to the card front. The adorable image is one of three included on the Whimsy Stamps Happy Birthday to You set available here.
The Copic colors that I have used are shown in the below photo -
Be sure to check out the wonderful prize that you could win just by entering a birthday themed card in One Crazy Stamper's monthly challenge. We are also looking for guest designer's for the coming months, so please check out all of the details by just clicking on the logo at the top of this blog.
 

Tuesday, August 13, 2013

Laundry Day

Welcome to Terrific Tuesday here at One Crazy Stamper and my card today follows this month's challenge theme of BIRTHDAY!!!! 
 
 
I have colored the image Lemon Pepper's Laundry Day stamp from Whimsy Stamps with my Copic Sketch Markers, then matted and mounted it on several papers from Echo Park's Beautiful Life collection.  The doily in the corner was inked with Antique Linen Distress ink, and the ribbon and sentiment are from my stash. 
Here's the recipe for my color choices:
Skin - E000, E00, E01
Hair & Basket - E41, E42, E43
Yellows - Y13, Y15, Y17
Blues - B32, B34, B37
Pinks - R81, R83, R85
Greens - G20, G21, G24
Orange  - YR16
Background - B0000
 
Check out this month's BIRTHDAY challenge by clicking on the icon at the top of this blog, and then get creative and enter to win a fabulous prize.