Showing posts with label Art Impressions stamps. Show all posts

Friday, April 24, 2015

Sally Swimmer

Happy Weekend everyone!

For Today's post I am sharing with you a card I made using the Art Impression stamp set called "Sally Swimmer". When I first saw this image I burst out laughing! She's quite the character isn't she? I think she is a true child at heart LOL!


The paper is from the Bo Bunny Lemonade collection. I love the bright colours of this collection! I added twine and charms on both of these cards. I'm loving enamel dots right now and the gumdrops from Your Next Stamp are wonderful! The sentiment on the front of the card comes with the Sally Swimmer set!


Here's a look at the inside of my card. The sentiment is another Ai stamp called "Style".


Copics used:
Skin E00, E11, R20, RV25
Tube: Y11, Y13, Y15, YR14, YG23, YG25
Goggles, earrings & flippers: YG21, YG23, YG25
Bathing suit: RV04, RV06, RV09, white Uniball pen polka dots
Sand: E30, E31, E33
Shadow around image: B000

You still have time to enter into our current Challenge for April called "Anything Goes".
We'd love for you to play along and I'd love to see what you come up with!
Happy crafting!


Thursday, April 23, 2015

Weekend Warrior

I have a card to share with you today as well as a quick tutorial, but first the card!
 

This would be a great card for the special man in your life, whether it be for a birthday, anniversary or Father's Day.  The image and sentiment are from the Art Impressions Weekend Warrior set that I have colored with Copics, then mounted it on dp from My Mind's Eye.  The ribbon and brads are from my stash.
 
Card Recipe
Skin - E01, E11, E13
Shirt/Hat - BG72, BG75, BG78
Pants/Hat - B21, B23, B24, B26
Gloves/Belt - Y21, Y23, Y26, Y28
Mask, Belt, Tools - W4, W7, W10
Drill - R24, R29, R39
Shadow under hat - C2
Ground - C2
Hat, Boots, Hammer Handle - E21, E23, E25
Background - YG61
 
Now here's my tutorial and it's for everyone out there who is tried of nozzles on adhesive bottles always being plugged.  All you need to fix the problem is some baby bottle nipples and a small piece of double sided foam tape.  What?!!!

Purchase baby bottle nipples that are silicone ( because the liquid will not stick to it ), will fit small bottles ( not the large size ), and are for 0+months in size.  My first attempt at buying the bottle nipples was wrong, so learn from my mistake and don't buy the brand Nuby Veri Flo Non-Drip kind - they have the wrong tip.  The Gerber brand pictured above is great!


After removing the original lid and cleaning off any old remnants of glue from around the neck of the bottle, tightly wrap one ( or two layers - this will depend of the width of the neck of the bottle - experiment and you will soon figure it out ) of the foam tape around the neck, then press it firmly around the neck.  Next stretch the baby bottle nipple over the tape until it is well seated around the rim, and then press firmly around the neck, sealing the bond between the nipple and the foam tape.
 
 
Now you are ready to use your new and improved bottle of adhesive with no plugs.
 
 
The other benefit is that you will be able to do thin lines of adhesive, or with more pressure you can thicken the lines.
Once you are done using the bottle just make sure to leave a small drop of the adhesive on the very tip of the bottle, which will dry and seal the hole.
 
 
The next time you need to use the bottle just flick off the dried adhesive on the tip and proceed to use.


So easy to do and you will love the result! 


Tuesday, February 3, 2015

Fairy Godmother Spinner Card

Hello OCS fans!  I have a very fun card to share today - using one of the new Art Impressions Spinners from their 2015 release.  This little fairy is my absolute favourite out of all the new Ai product!  I've made a spinning easel card to show her off, here is Fairy (Sku #4576):
 The Spinners are literally designed to spin!  The set comes with both a front and back image, and a sentiment.  I have sandwiched a piece of thread between the front and back when I glued her together, and then I've suspended the thread between my die cut frame.  Here's a close up where you can see the thread:
 After colouring the fairy, I used pieces of washi tape to secure two Spellbinder's dies together, and then cut them out twice in the turquiose cardstock to form my frame:
 After fussy cutting the fairy, I drew a light pencil line on the wrong side of her, and ran a line of glue down it to adhere the piece of thread.  Then I glued the fairy together, and sandwiched the top and bottom ends of the thread between the frame pieces.
 My card base is 5 1/2" x 11".  You can see below that I glued two matted pieces of star print paper onto the card front.  I scored a line across the front between the two panels - this is where the card will fold up to the easel shape.  I positioned the smaller of the two dies (the photo shows both, but I removed the larger die before cutting!) in the middle of the front and ran it through my Cuttlebug.  Then I glued the bottom half (only!!) of the turquiose frame on top of the opening, so that when the front is bent upwards, the fairy would be suspended in the frame.
Here is what the card looks like closed:
And finally a few more shots so that you get the idea - you won't believe how difficult this card is to photograph, as she literally spins all the time.  I set her spinning, then quickly shot a bunch of photos until I got her facing forward - it was quite funny :o)

 One Crazy Stamper products: Art Impressions Fairy Set (Sku #4576)

Friday, November 28, 2014

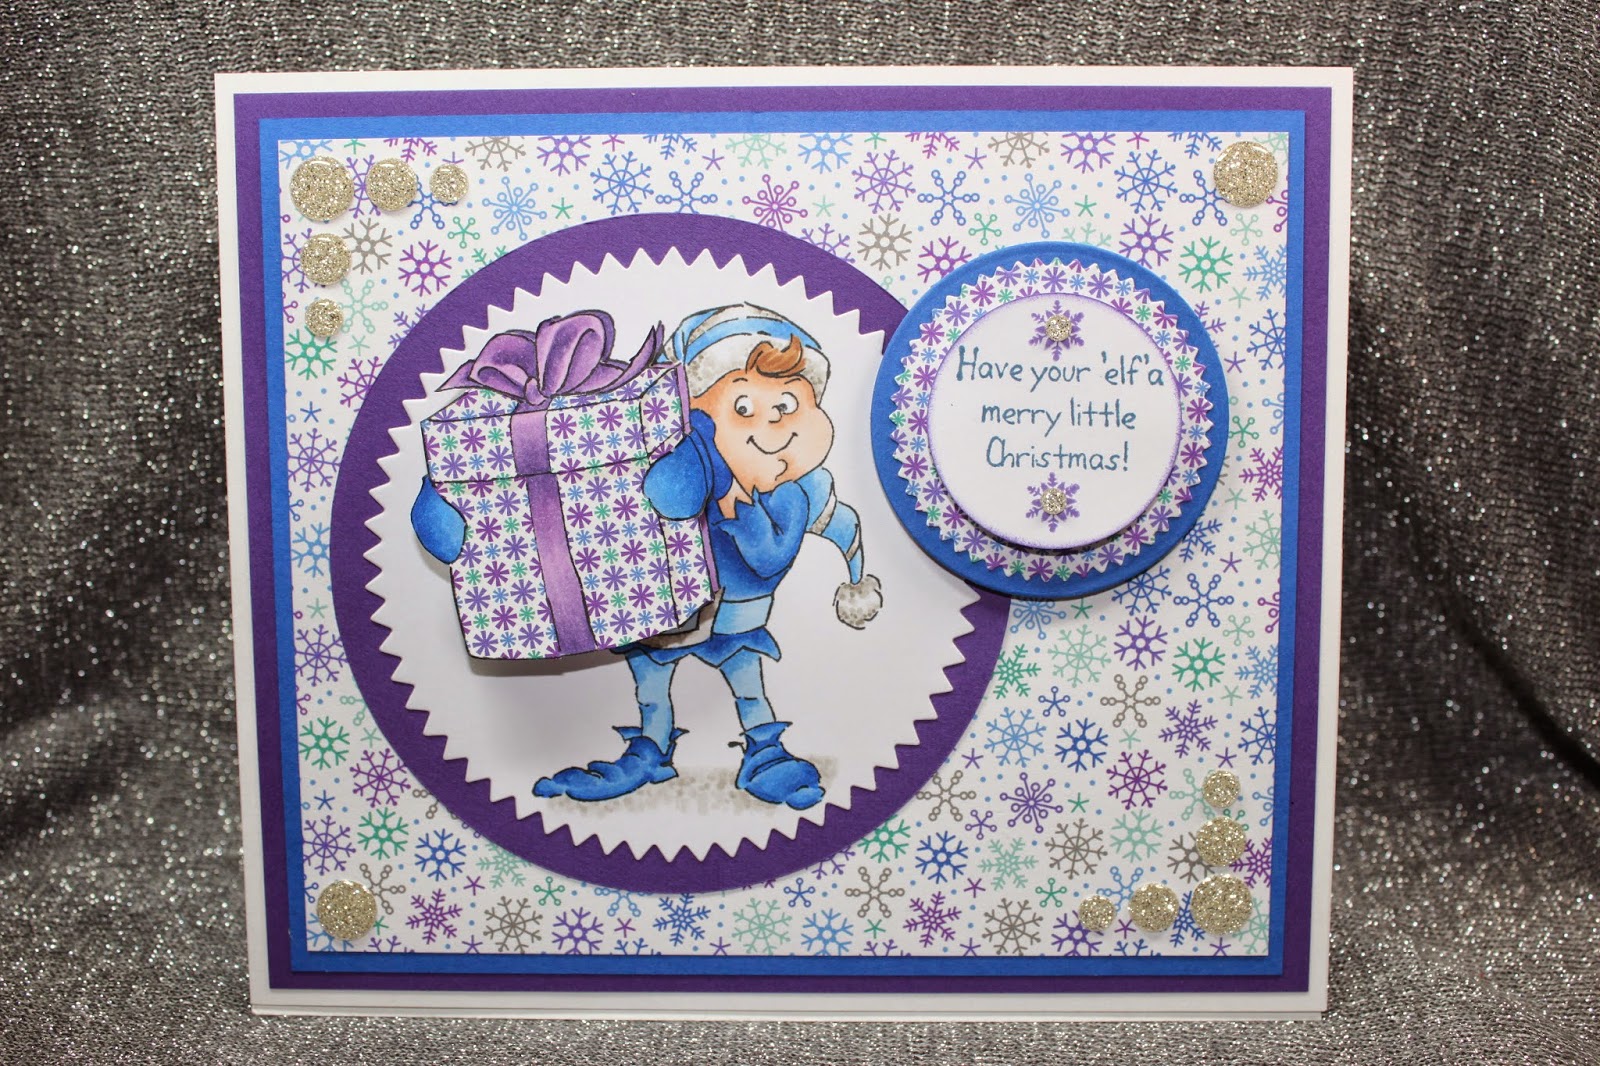
Action Wobble Tutorial

Hello and Happy Friday! Today I have a fun tutorial to show you on how to use an "Action Wobble"!  If you have never used one of these amazing craft tools this is a must try - but be forewarned - they are very ADDICTIVE!  Once you start using these fun tools you will always be finding new ways to use them on cards or on your scrapbook pages!
 
Today's project I decided to show you a set made by Art Impressions that sells the Action Wobbles with the stamp so that you may try them out and fall in love, or if you love the idea of the Action Wobbles you can also purchase them from the OCS Store in a 6 pack or 12 pack to start playing and enjoying all the fun!
 
So now that I have got you interested, here is my project for you today....
 
In the photo below you can see the supplies that I used for this fun project,
 
Supplies Used:
* Art Impressions Elf Shaker Stamp Set (Elf, Present, Sentiment and Wobble)
* Coloured Image
* Coloured / Paper Pieced Present for the Wobble part
* Your Card Base (I have chosen to complete a Isle card)
* Patterned Paper: Doodlebug 6x6 Frosty Friends
* Your Next Stamp Gumdrops - Glitter Silver (also highly addictive!)
* Memento Inks: Tuxedo Black, Nautical Blue & Grape Jelly
* 3D Pop Dots
* Squishy Scissors to cut out the Wobble present piece(and paper pieced pieces)
* Copic Xpress It Card Stock
* Copic Sketch Markers

Below is a close up of my coloured image, the Wobble part of the present and the Action Wobble.  As you can see I did not colour the present on the image the same as the Wobble present. The reason for this is that you will not see much of the background present so I coloured it in the darker hues to make it look like shadows instead, but you can colour it completely the same as the Wobble piece if preferred.
 Copic Colours Used:
* Skin:  E11, E00, E000
* Hair:  E25, E23, E21
* Blues:  B28, B26, B24, B23, B21
* Purples:  V17, V15, V12
* Greys:  W5, W3, W1
* Present:  paper pieces with Doodlebug 6x6 Frosty Friends

Once you have you image all coloured and ready to assemble, turn your Wobble piece upside down and remove the paper from the "image" side of the Action Wobble and attach to the center of your piece as shown below....

Next step is to remove the other backing on the Action Wobble and place your Wobble piece exactly over the same part of you image that matches.  In my picture below the Wobble piece looks off but it is only because I have taken the photo from the side to show you the amazing height of the Action Wobble =) ....

Below you can see the Action Wobble in "action" shakin' around....

Assemble your project....

And Voila! Here is the finished project!  I have made this fun card and matching gift bag for my Sister-in-Law who loves purple =) ....

I hope that you enjoyed today's tutorial and I really hope that you will try out these amazing Action Wobbles, you will not be disappointed.  I would love to hear what you think!


Until Next Time, Keep Crafting!
Hugs;

Thursday, July 3, 2014

Hot Tub Gals

Hello everyone!  I hope your summer is in full swing like it is around here... and what could be a better activity on a sunny afternoon, than sitting in a hot tub, sipping wine with your girlfriends?  I have a bright & summery card for you featuring an Art Impressions stamp called In the Tub (Sku #U3564):

I kept my card fairly simple, since I used such a large, bright image: I've stitched around the edges with my sewing machine, tied two colours of Baker's Twine around the card, and popped the image up on some pop dots.  I scattered a few Pearl Gems around the outside to sparkle things up a bit.

Lora has a wonderful selection of Art Impressions stamps in the OCS store - click on the links below to find out where you can find it all!  Happy stamping everyone!
One Crazy Stamper products: Xpress It Blending Cardstock
 

Tuesday, June 3, 2014

The Grillfather...

Happy Tuesday, everyone!  I have a square card to share today using a stamp set from the Art Impressions line of stamps "Ai Heroes", called "Grillfather".  His pose cracks me up,  because it looks like he's about to have a sword fight with a hamburger!  This is the perfect card for my brother-in-law who really is The Grillfather.
Here's a close-up:

There are five Ai Heroes (Bug Buster, Backyard Boss, Weekend Warrior, Sexy Scrublord and Grillfather) - and you can find all of them in the OCS store here.  They are perfect as Father's Day cards, or just general guy birthday cards.
Don't forget to play along with our June challenge, which is Anything Goes with a splash: glitter and a ribbon - you can link up your card here.
One Crazy Stamper products: Art Impressions The Grillfather