Friday, April 4, 2014

Jelly Bean Nap!

Hello and Happy Friday!!!  Today I have an Easter card to show you that I made for my husband using the adorable "House Mouse Designs, Jelly Bean Nap"....


Here is a look at the inside of the card....
 
Here is a close up of the cute little mouse to see the Copic colours used....
 Copic Colours Used:  * Mouse Skin: E00, E000  * Mouse Fur & Ground: T4, T2, T0  * Mouse Ear: E00, E000, RV000  * Blue: B16, B12, B14  * Pink: R85,R83, R81  * Green: G24, G21, G20  * Orange: YR16, YR14, YR12  * Yellow: Y19, Y15, Y13  * Purple: V17, V15, V12  *

So what did you think?  Please be sure to come back to the OCS blog to see my post on Good Friday as I have something special to share with you all using a House Mouse Designs image!!!


Until Next Time, Keep Crafting!
Hugs:

Thursday, April 3, 2014

Seniorita Gloria

Hello everyone!  I seem to be in a "bright" phase this week...it helps chase away the winter blahs!!  I am sharing a card using Stamping Bella's Seniorita Gloria, and I reached for my Doodlebug Springtime papers again...
I popped her up with some pop dots, then added a few enamel dots and some Baker's Twine.  I keep my cards fairly graphic & simple, so I opted to put the sentiment on the inside:

Here's a closeup of Gloria:

 
That's it for me for the month of April!  I'll see you in early May for my next post.  Don't forget that our challenge this month is "Anything Goes!"  You may use any stamped image for your card or project (no digis, please!) you can link up your creation here.
One Crazy Stamper products used:
 
Happy stamping!  Karen.

Tuesday, April 1, 2014

April "Anything Goes" Challenge

As March is over,  we are back with a new challenge here at OCS. The OCS Design Team are using an assortment of stamps this month and the challenge theme is "Anything Goes".  You can use any stamp except for digital images.  You have all month to join in the fun for a chance to win a fabulous prize from OCS.
 
Create a project following our theme and enter it into our InLinkz tool below!

Challenge Details/Rules:
- YOU CAN USE ANY IMAGE YOU WANT EXCEPT DIGITAL IMAGES.  Any entry using a digital image will be deleted.
- You have all month long to join in our challenge.
- You can enter up to 5 times.
- Only new projects, no back linking to old projects.
- You must link the OCS blog in your entry post.
- Following the OCS blog or Facebook page is appreciated

This month you have the chance to win 2 Your Next Stamps from One Crazy Stamper just for playing our Blog Challenge.


Kerri

Image- STAMPINGBELLA Uptown girl MAYBELLINE..COPICS & PRISMA PENCILS to colour..MEMENTO TUXEDO BLACK INK..and X-PRESS BLNDING PAPER..
Shop T'il You Drop(Little Darlings)


Monday, March 31, 2014

March Challenge Winner

Thanks for joining in our challenge this month. We had fun looking at all the fabulous entries!  We used random.org to choose the winner.

This months winner will be sent the Whimsy Prize pack and the winner is:

#29  -- Jane Z

Please email lora at onecrazystamper dot com to claim your prize.

Check back tomorrow for our new monthly challenge and another chance to win!

Saturday, March 29, 2014

How To Do Shabby Chic Tutorial

Hello Crafty peeps! I'm sure some if not all of you love and have seen these shabby chic styled cards and wondered how they do it. Because I know I did, so today I'm going to show you how.

My idea of shabby chic is a vintage, girly and distressed look. Most of all it has to be over the top embellished with lace, jewels, pearls, butterflies, flowers and lots of pretty stuff.  A little curled up corner with some tears here and there will also do the trick. I will be using a few key products that really help add to the over all shabby chic look. Go grab a cup of tea and enjoy!

Here is my card! 

Below is the How To Do Shabby Chic
As always I start off with a selection of design papers and my coloured image.

cheesecloth can be found at most grocery stores, it is great for crafting and making soups too!

After cutting a square of cheesecloth, it needs to be manipulated. To achieve this look pull and stretch the cloth in all directions, then gently fray the loose strings along the edges. Pictured top is a cut a 3x3 square, on the bottom are two different shapes of cloth that were manipulated.

Same goes for the burlap, cut a piece and manipulate it by stretching and pulling to your liking.

A close up

These two products combined help put the shabby in the chic. 

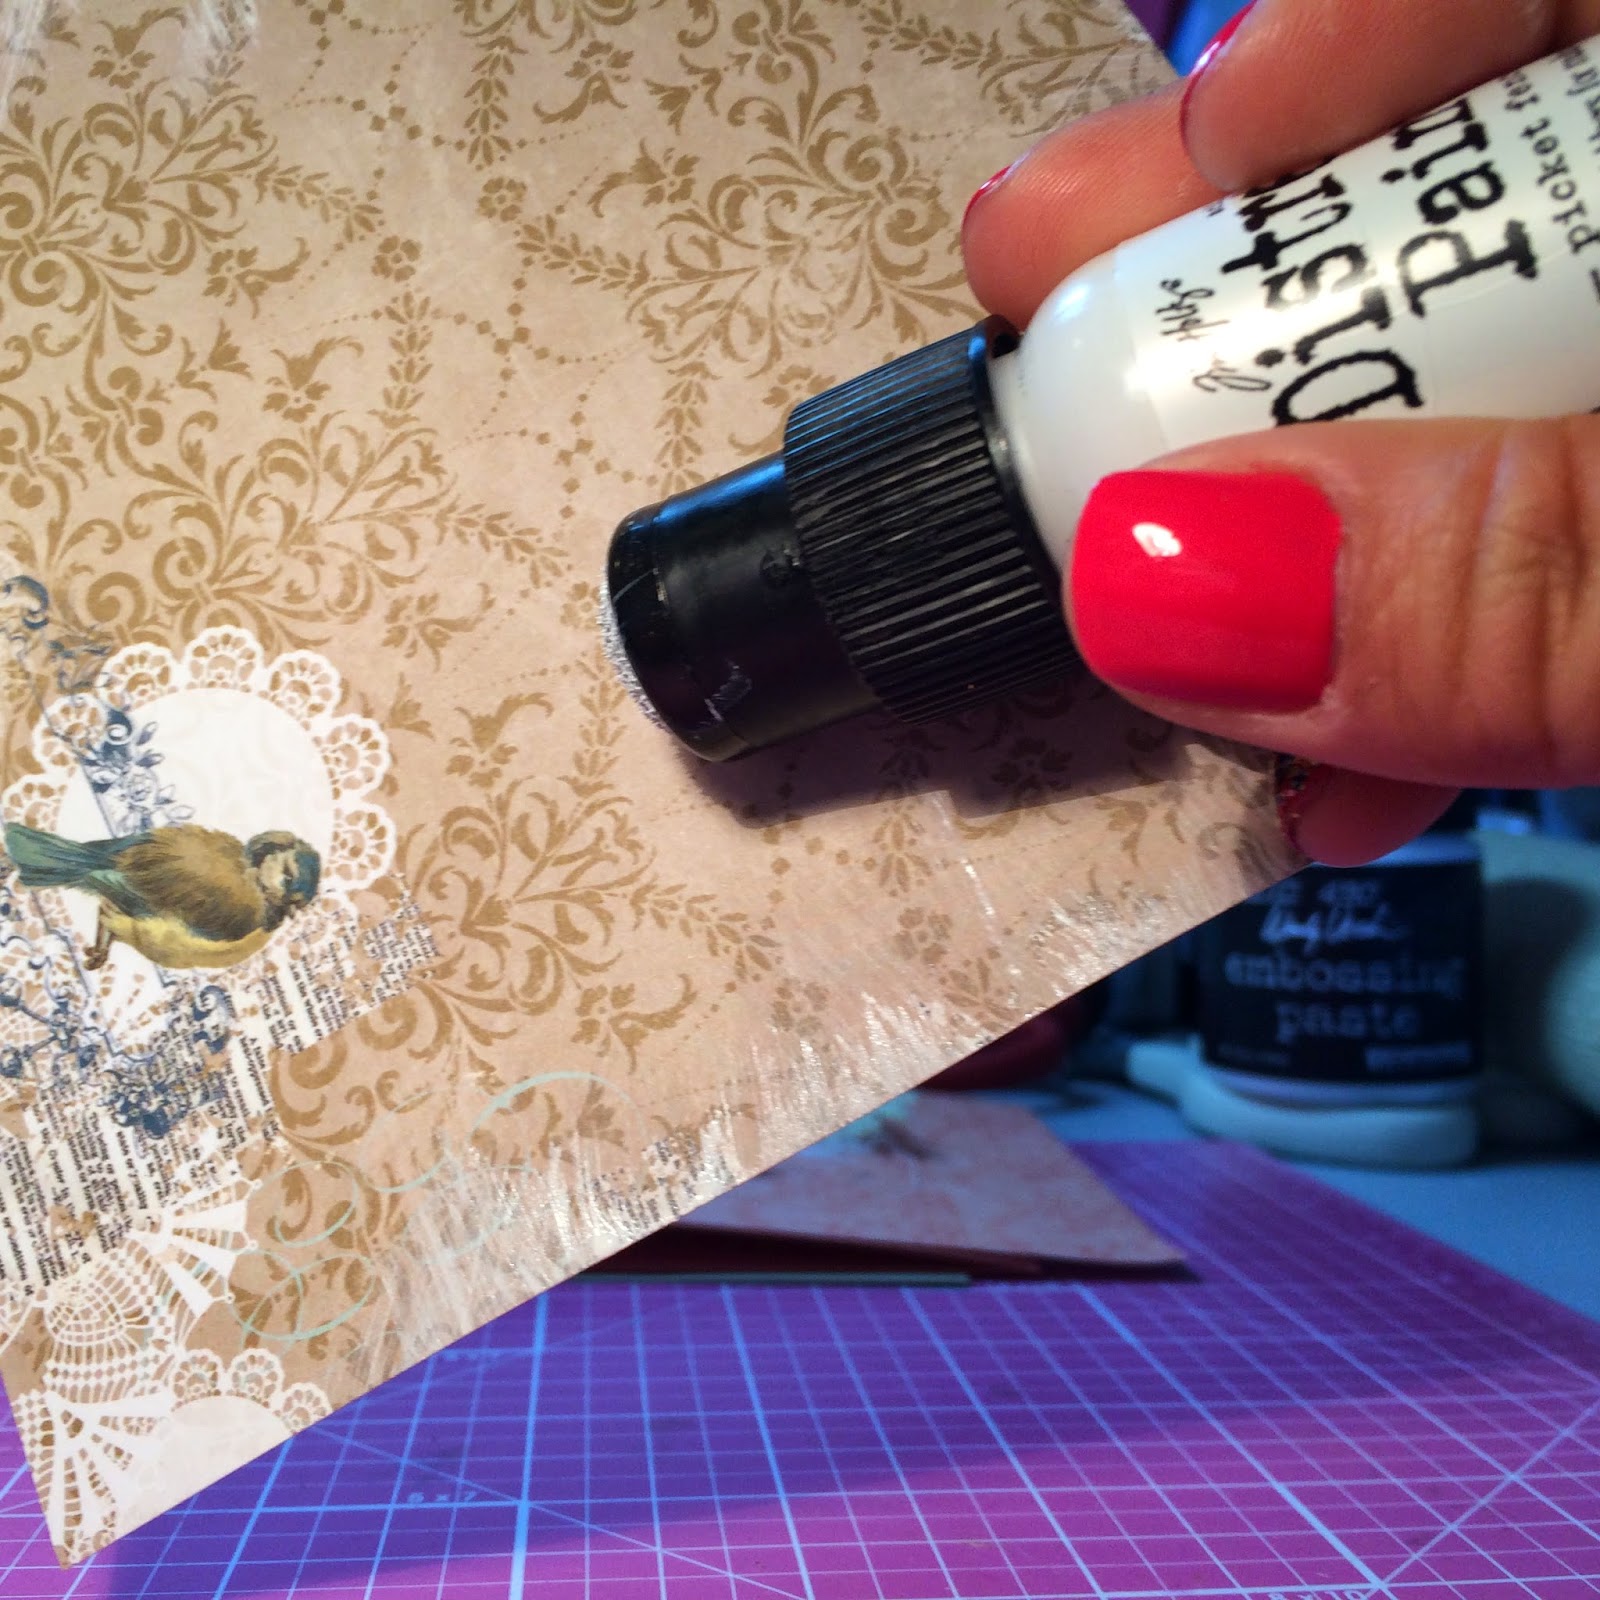
This distress paint has a dauber top applicator great for easy use and application. Along the edges paint it on starting from outer edge and feathering inward. Repeat until you are satisfied with the depth of paint colour and distressed look.

Finished look with distress paint. 

Another super fun product to work with is the embossing paste, I've seen it used with stencilling but thought it would work good for a shabby chic look. 

This paste is quite thick and gives a great 3D distressed effect. Using a sponge pouncer I applied the paste along the edges with a carefree approach. 

Finished look, allow this step to dry. 

This fun step involves embossing powder, embossing enamels, glitter and mica fragments. 

I inked up the edges with versamark and covered it with a clear ultra thick embossing powder. The ultra thick embossing powder is an essential base to allow the mica fragments to have something to adhere to. (sticky embossing powder works too)

I sprinkled on a medley of embossing powders, glitter, fragments and mica. 

Here is what they look like after being heat set. Always heat set from underneath or you will loose all your beautiful powders and fragments! (left is with embossing powders and fragments, right is just embossing powders. 

Finally raid your stash for ribbons, lace, pearls, jewels, flowers and embellish until you cannot embellish no more!

 Have a fabulous day!!

Supplies Used

Copic Markers 


Friday, March 28, 2014

Whimsy Stamps - Think Spring Bunnies

Hello and Happy Friday!!!  Next month as you know is Easter so today I have a card to show you that I made for my parents for Easter using the new Whimsy Stamps Think Spring Bunnies....
As you can see on the sign I changed it from "Think Spring" to "Just For You"!  Since it is easy to change out the words it makes this stamp so much more usable!
 

Here is a look at the inside of the card....
 Supplies Used:  *Image:  Whimsy Stamps - Crissy Armstong's Think Spring Bunnies  * Copic Xpress It Cardstock  * Copic Sketch Markers  * Memento Inks:  Tuxedo Black, Rose Bud & Dandelion  * Sakura Clear Glaze Pen  * Sakura Clear Star Pen   * Best Glue Ever!  * 3D Pop Dots  * Pearl Gems - Dainty  *

Here is a close up of the adorable little bunnies to see the Copic colours used....
 Copic Colours Used:  * Bunnies: E49, E47, E44, E43, E42, E41, E40  * Ear & Nose: RV10, E40  * Sky: B000, B0000, 0  * Grass & Leaves: G46, G43, G40  * Flowers: Queen & Co. Jewels + Dress It Up  * Butterfly: V17, V12  * Fly: Sakura Clear Star Pen   * Sign: Y15,Y13, Y11  *

I hope that you enjoyed today's card and maybe I have inspired you to crate an Easter project of your own =)


Until Next Time, Keep Crafting!
Hugs; 

Thursday, March 27, 2014

Cute Little Bunny!!

Good morning to all of my fellow card markers out there..Here is a little cutie for ya!! Who does not love a little girl hugging a bunny!!  This is a WHISMY IMAGE as per picture below..Just in time for EASTER..We just might have to get that Easter Bunny some snow shoes..

WHISMY IMAGE used and I stamped it onto white card stock..X-PRESS BLEND IT!! The ink that I used is MEMENTO BLACK TUXEDO BLACK

In this above picture is all of the colours that I used to colour in the image..I also put down which part I coloured in..The pencils used are for shading...

If you have time stop by the challenge blog and make something the theme is Anything goes!!  The prize pack is from WHISMY!! ONE CRAZY STAMPER CHALLENGE BLOG  All of the supplies that I listed here can be found at Lora's awesome store..ONE CRAZY STAMPER  Have a great day and be happy and safe!!!

Wednesday, March 26, 2014

Wishing for Spring!!!

Hi All;

This month has certainly lived up to the saying "March comes in like a lion and goes out like a lamb".  It seems that this March has been nothing but a lion all month long and we are all wishing for spring and the warmer weather.

For my last post for OCS this month, I have used this adorable stamp from Whimsy Wee Stamps Collection called Iris designed by Sylvia Zet.


Instead of using Design Paper, I used the Spellbinders M-Bossabilities embossing folder called Splendid Design Side A to emboss a sheet of plain white cardstock and using a sponge pouncer I coloured it with  Lime Green 3D Stamp Paint from Viva Decor, which gives a glittery effect.  As this is the first time I have played with this new product I only used one colour, but I can't wait to try some colour combinations.

Supplies used:  
  • Stamps:  Iris, Ticket Sentiments (both from Whimsy Stamps)
  • Ink:  Tsukineko Memento Tuxedo Black
  • Paper:  X-Press It Blending Cardstock
  • Copic Markers:  Skin: E0000 - Floral White, E000 - Pale Fruit Pink, R20 - Blush; Hair:  E50 - Egg Shell, YR31 - Light Reddish Yellow, Y28 - Lionet Gold; Dress: G0000 - Crystal Opal, G000 - Pale Green, G00 - Jade Green; Wings:  BG0000 - Snow Green, BG000 - Pale Aqua, Bg10 - Cool Shadow, BG11 - Moon White; Flowers:  V0000 - Rose Quartz, V000 - Pale Heath, V01 - Health; BV0000 - Iridescent Mauve, BV000 - Pale Thistle, BV00 - Mauve Shadow
  • Atyou Spica Glitter Pen:  13 - Lilac
  • Wink of Stella Brush:  999 GL Clear
  • Spellbinders:  M-Bossabilities - Spendid Design A; Adorning Squares Die
  • Viva Decor 3D Stamp Paint:  Lime Green
  •  Miscellaneous:  Papermania Vintage Notes Lace Border; Prima flowers,
There are still a few days left to enter this month's "Anything Goes Challenge" for a chance to win a fabulous prize pack from OCS.


Tuesday, March 25, 2014

Life's a Beach

Wow, another month has flown by, but you still have a few days left this month to enter the One Crazy Stamper challenge of Anything Goes with any stamped image - no digital images are allowed!!
For the entire month the design team has been featuring images from our sponsor company - WHIMSY STAMPS, and my card today has a wonderful Elisabeth Bell image called Beauty.

Once again I have used Copic sketch markers to color the image, and then I used a Sakura Stardust pen to add highlight to the mermaid tail ( you probably can't see the shine of the fins, but it looks great ! ). I used my Grand Calibur and a Grand die to cut the shape of the card, then layered paper from Authentique's Renew collection for added color. The ribbon and sentiment are from my stash.
Card Recipe
Tail - BG70, BG72, BG75
Skin - E00, E01, E02
Shirt & Shell in Hair - Y000, Y02, Y06
Hair - E13, E15, E19, YR24
Sakura Stardust pen
Have a great day, and be sure to enter One Crazy Stamper's challenge this month to win a fabulous prize.

Monday, March 24, 2014

Crown of Daisies

Hello friends, so glad you came back to see what I am show casing for One Crazy Stamper challenge blog today, and you know our challenge is "Anything Goes" this month. 
Our stamp company we are using for the month is non other than Whimsy Stamps.
Whimsy Stamps
Love these stamps, they are rubber and we know how much we love them. Today on my card I am using this ubber supper cute image from talented Crissy Armstrong Collection called Crown of Daisies.

 Oh and I do know that daisies aren't normally purple/lavender, but I like this color.
Crown of Daisies C1115
So cute, and fun to color up.  I sure do hope you get in your craft room and craft with us and play along.  Lora has tons of wonderful supplies in her store and online store.  Please stop by our challenge blog and play along this month, always awesome prizes too.  The only thing we ask is to use rubber or clear stamps on your project, NO digis.  Thanks!  Till next time, happy crafting!
Supplies: Washi Tape-American Crafts, Stamps-Whimsy Stamps Crown of Daisies, Flowers, Foam Tape, Spellbinders, Leaf Punch, Glue Dotes, Embossing Folder, Copic Xpressit Card Stock, Copic Markers-E41, E47, E42, E49, E44, E93, E50, E51, E11, E23, YG17, YG67, YG93, BG11, BG13, BG15, RV99, RV95, RV93, RV91.