Showing posts with label Tutorial. Show all posts

Friday, June 26, 2015

June Tutorial - Shrink Plastic!

Hello and Happy Friday!!!  Today I have a special Tutorial to share with you on how to use "Shrink Plastic" on your cards and scrapbook pages. Have you ever looked at someone's project and saw them use shrink plastic and wonder how they do that, well you can find out here today!!! You can choose to cut the Shrink Plastic using scissors, with your die cut machine and your dies or you can stamp and image using StazOn ink and cut out and colour using your Copic Sketch Markers.

Today you will see three completed examples, one I cut the plastic with a Spellbinder shape,  one I just stamped and cut out with scissors and the other one I stamped, cut and coloured with my Copic Sketch markers! Check it out...

To Start off you will need to have Inkssentials Shrink Plastic by Ranger....
Inkssentials Shrink Plastic Sheets P29809
 
And below you will see the other supplies I used for this project....
 Supplies Used:
* Inkssentials Shrink Plastic by Ranger
* StazOn Timber Brown Ink
* Memento Ink: Tuxedo Black
* Distress Ink: Broken China
* Copic Xpress It Cardstock
* Copic Sketch Markers
* Image:  High Hopes Stamps, Bob Hooked a Big One
* Sentiments:  High Hopes Stamps, Bold Happy Birthday & Keep Clam & Fish On
* Mini Blending Tool
* 1/4" Hole Punch
* Spellbinders Die - Pearl Effects
* Sizzix Waves Embossing Folder
* Paper - Bella Blvd Camp Out 12x12, Jump In The Lake
* Twine
* Button
* Red Cardstock
* White Cardstock
* Craft Heat Gun
* Scissors
* "Pokey" Tool
* Glossy Accents

Now that you have your tools you can get started!  The first example I am going to show you is how to use your Copic Sketch Markers to colour on Shrink Plastic. When choosing an image you plan to stamp and colour you first need to sand one side of the plastic with sand paper in a cross hatch pattern as shown in the photo below, can you see the scratch marks?...
 Once you have sanded one side of the plastic, turn over your piece and stamp your image on the smooth side using StazOn ink - I have chosen to stamp just the fish from the image I am using on the card you will see later. Cut out your image using scissors or a die shape.  If you wish to hang your plastic piece from twine, ribbon, etc. you will need to punch a 1/4 hole before you colour and shrink.  Once the ink has dried, turn over your piece and colour on the sanded side using your Copic Sketch Markers, see photo below of mine coloured before I shrink it, I chose to use the dotted technique to make scale line texture on the fish....

In the next example I stamped the High Hopes Stamps Sentiment "Keep Calm & Fish On" with StazOn ink and have cut out with scissors.  ....
 As you can see the image does not look perfect but just wait all will work out perfect!!!

In the last example I have cut out the plastic using my Spellbinder Pearl Effects Die then stamped on the High Hopes Stamps Bold Happy Birthday sentiment using StazOn ink....

Now that you have prepared all your pieces we are ready to "shrink" each piece to 45% of it's size!  All you need now is your "pokey" tool to hold your piece and your Craft heat gun.  Fan your heat gun over your plastic piece and once it starts to heat up it will start to shrink.  You will find that the plastic will start to curl into a ball - don't be afraid this is suppose to happen, see photo below....
 To straighten the "curl" and complete the shrinking process just turn over your piece and heat.  Your piece will take on the right look now.  Turn your piece back over to have the front forward and heat it up a tiny bit more then take your acrylic stamp block and press it on top of your plastic piece to make sure it is flat and straight.  Super easy right?? Now if you have other prepped, complete the same process and shrink =)

Below you can see some pictures of the original size vs. the 45% shrunk pieces to see how cool this really is!....


Here are all 3 pieces completed....
I decided after I took this photo that my Happy Birthday piece did not show up on the card the way I wanted it to so I decided after to take my R29 Copic Sketch Marker and just colour the back of the piece to have the red show through and make it pop off the card
 
Here is my completed card with my new "Plastic Embellishments" added....

Here is a close up of Bob to see the Copic colours used....
 Copic Colours used:
* Skin: E11, E00, E000
* Hair:  T4, T2, T0
* Hat:  E42, E41, E40, B99, B97, B95, T4, R24+ Glossy Accents
* Glasses:  R29, R24, R22, T6, T4 + Glossy Accents
* Shirt:  R29, R24, R22
* Pants:  B99, B97,B95
* Boat:  R29, R24, R22, T4,T2,T0
* Fish:  BG99, BG95, BG93, BG91
* Fishing Rod:  E42, E41, E40, T4, T2, T0
* Lure:  R29, R24, R22 + Glossy Accents
* Water:  B12, B00, B0000

Well I sure do hope that you enjoyed today's tutorial and maybe I have inspired you to give this "easy" technique a try!!!!


Until Next Time, Keep Crafting!
Hugs;


Friday, November 28, 2014

Action Wobble Tutorial

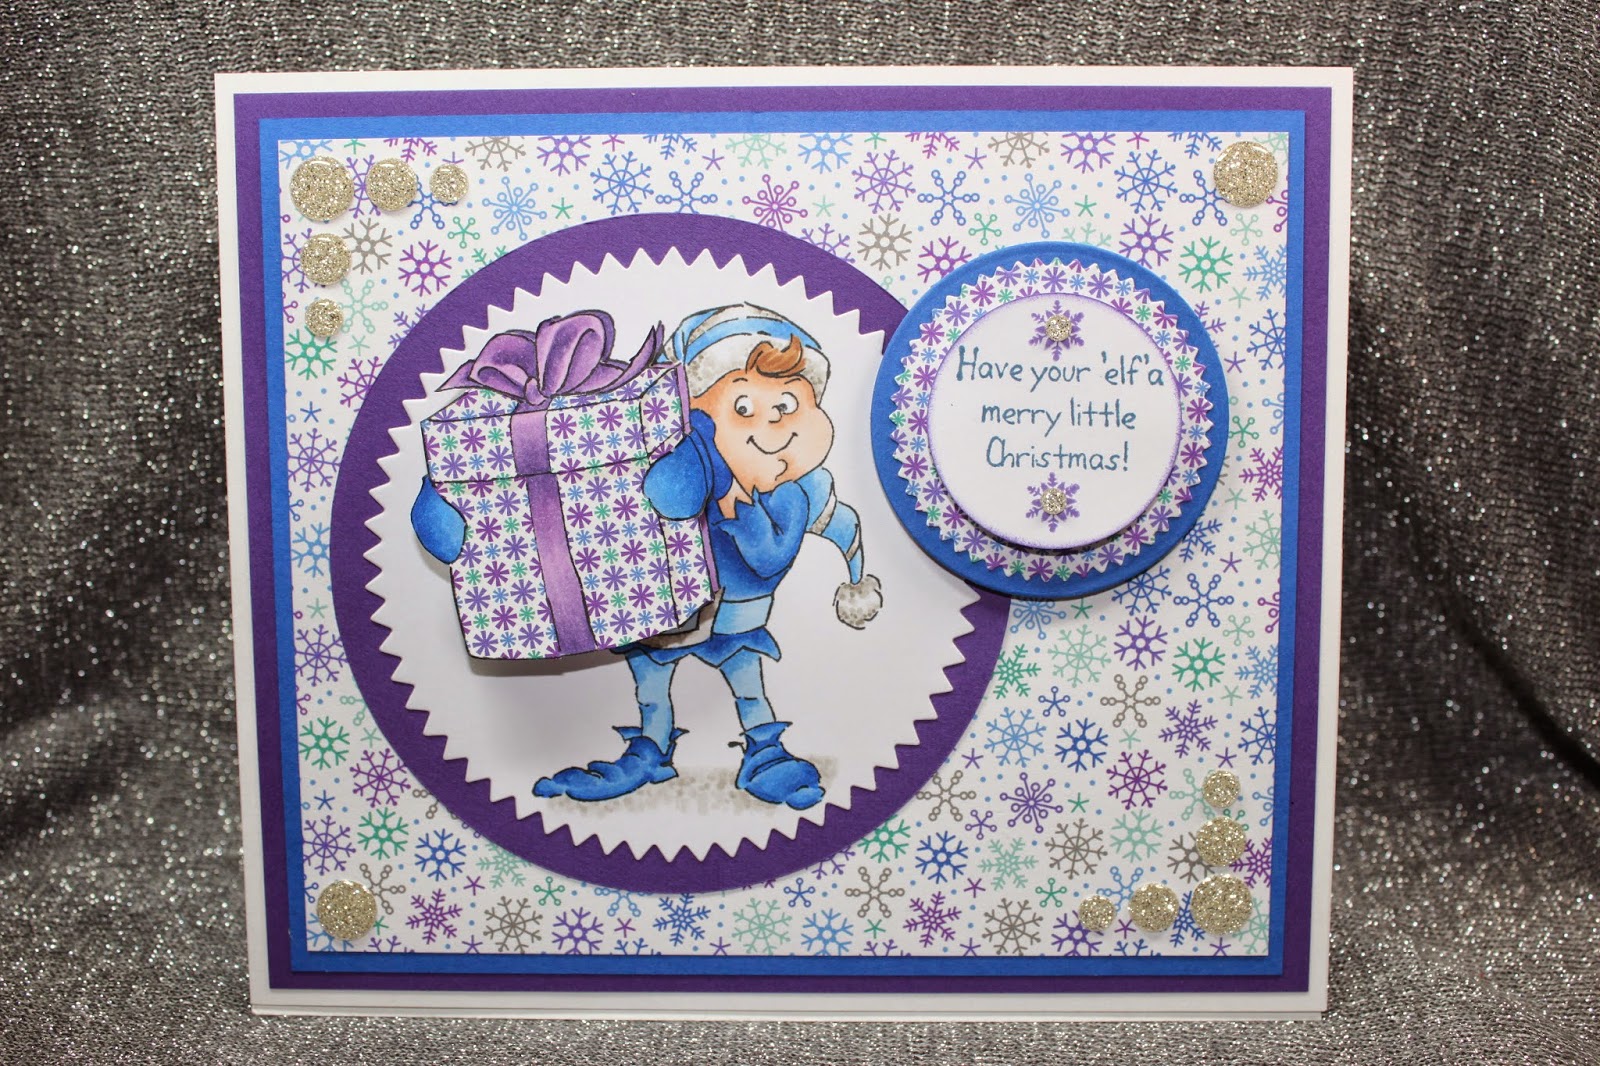
Hello and Happy Friday! Today I have a fun tutorial to show you on how to use an "Action Wobble"!  If you have never used one of these amazing craft tools this is a must try - but be forewarned - they are very ADDICTIVE!  Once you start using these fun tools you will always be finding new ways to use them on cards or on your scrapbook pages!
 
Today's project I decided to show you a set made by Art Impressions that sells the Action Wobbles with the stamp so that you may try them out and fall in love, or if you love the idea of the Action Wobbles you can also purchase them from the OCS Store in a 6 pack or 12 pack to start playing and enjoying all the fun!
 
So now that I have got you interested, here is my project for you today....
 
In the photo below you can see the supplies that I used for this fun project,
 
Supplies Used:
* Art Impressions Elf Shaker Stamp Set (Elf, Present, Sentiment and Wobble)
* Coloured Image
* Coloured / Paper Pieced Present for the Wobble part
* Your Card Base (I have chosen to complete a Isle card)
* Patterned Paper: Doodlebug 6x6 Frosty Friends
* Your Next Stamp Gumdrops - Glitter Silver (also highly addictive!)
* Memento Inks: Tuxedo Black, Nautical Blue & Grape Jelly
* 3D Pop Dots
* Squishy Scissors to cut out the Wobble present piece(and paper pieced pieces)
* Copic Xpress It Card Stock
* Copic Sketch Markers

Below is a close up of my coloured image, the Wobble part of the present and the Action Wobble.  As you can see I did not colour the present on the image the same as the Wobble present. The reason for this is that you will not see much of the background present so I coloured it in the darker hues to make it look like shadows instead, but you can colour it completely the same as the Wobble piece if preferred.
 Copic Colours Used:
* Skin:  E11, E00, E000
* Hair:  E25, E23, E21
* Blues:  B28, B26, B24, B23, B21
* Purples:  V17, V15, V12
* Greys:  W5, W3, W1
* Present:  paper pieces with Doodlebug 6x6 Frosty Friends

Once you have you image all coloured and ready to assemble, turn your Wobble piece upside down and remove the paper from the "image" side of the Action Wobble and attach to the center of your piece as shown below....

Next step is to remove the other backing on the Action Wobble and place your Wobble piece exactly over the same part of you image that matches.  In my picture below the Wobble piece looks off but it is only because I have taken the photo from the side to show you the amazing height of the Action Wobble =) ....

Below you can see the Action Wobble in "action" shakin' around....

Assemble your project....

And Voila! Here is the finished project!  I have made this fun card and matching gift bag for my Sister-in-Law who loves purple =) ....

I hope that you enjoyed today's tutorial and I really hope that you will try out these amazing Action Wobbles, you will not be disappointed.  I would love to hear what you think!


Until Next Time, Keep Crafting!
Hugs;

Friday, June 6, 2014

June Tuorial - How to make a bow using your Envelope Board

Hello, I`m glad you popped by today as I have a fun tutorial to show to you on how to make a bow using your Envelope Board! 

By now everyone has either used or at least heard of the We R Memory Keepers Envelope Punch Board, well I have come up with a way to create beautiful bows for your cards, envelopes, gifts, etc. using this amazing tool.

SUPPLIES USED:
  * We R Memory Keepers Envelope Punch Board
  * 1 piece of 12x12 Bazzil Avalanche Cardstock (or cardstock of your choice)
  * Trimmer
  * Scissors
  * Embossing Folder (I used Cricut Swiss Dots & Elizabeth Crafts Spring Leaves)
  * Mini Glue Dots
  * Cuttlebug (or other embossing machine)

DIECTIONS:
Using your trimmer cut the following pieces from your cardstock;
  * 1 piece at: 1" x 6"
  * 1 piece at: 1" x 4"
  * 1 piece at: 1" x 1/4"

Take your 1x6 piece and using your punch board line your paper up at 3" and punch.  Turn the paper around and repeat for the opposite side - see photo below....

Still working with the same piece, line up the end of the paper in the center of your punch are and punch - see photo below....

Repeat the last step for all four corners of the ends - see photo below of the complete piece (this pieces will be the "loops" on your bow)....

Take your 1x4 piece and line up one end centered in your punch area and punch, repeat for the opposite end as well - see photo below (this piece will be the "tails" of your bow)....

Run all three of your cut pieces through your embossing folder and Cuttlebug to add a decorative look to your bow.  Do not worry if your loop piece sticks out of your embossing folder a little as this part of the loop piece will be on the underside of your bow and not seen - see photo below....
 
 
Using your Envelope Maker Scoring Tool, curl the two "loop" ends - see photo below....

Forgot one step along the way...take your 1x4 piece and punch both sides at the 2" mark - see photo below....


Using a Mini Glue Dot on the back side of your "loop" piece in the center of the punched area, fold around your loops and attach to the glue dot. Then put your "tail" under the "loops" and wrap your 1x1/4 piece around the bow and stick with a final glue dot on the back. Trim your piece with scissors once secure - see completed bow in below photo....

I have figured out three sizes of bows that work well, please see below...

SMALL: 
  * 1 piece at: 1" x 6"
  * 1 piece at: 1" x 4"
  * 1 piece at: 1" x 1/4"
  *Score at:  3"

MEDIUM:
  * 1 piece at: 1" x 8"
  * 1 piece at: 1" x 6"
  * 1 piece at: 1-1/4" x 1/4"
  *Score at:  4"

LARGE:
  * 1 piece at: 1" x 10"
  * 1 piece at: 1" x 8"
  * 1 piece at: 1" x 2"
  *Score at:  5"

Here is a picture of all three sizes as described above =) ....
 I embossed the large bow using the Elizabeth Craft Designs Spring Leaves embossing folder.

I hope that you enjoyed today`s tutorial.  I hope you get a chance to try it out to add a little something to a card or gift or even on the outside of your homemade envelope!


Until Next Time, Keep Crafting!
Hugs;

Friday, November 8, 2013

Tutorial Time! Exploding Christmas Tree Box / Card

Hello and welcome to my exciting Friday Tutorial Post.  Today I would like to show you how to create an EXPLODING CHRISTMAS TREE BOX/CARD.  I am going to warn you that this post is very picture heavy but well worth the look.  Please take the time to read all the way through and let me know what you thing =)

If you have never heard of an exploding box/card you are in for a special treat.

Don't let the list of supplies needed to scare you off as most of the items listed are items you will already have in your craft tool box along with some special pieces that I used =)

Supplies Needed: 
* 2 pieces of matching 12x12 Bazzill Cardstock  (1 for the box at 12x12 and 1 for the lid at 6-1/8x6-1/8) 
* Paper Trimmer
* Scor-Pal 
* Scor-Tape 
* Squishy Scissors (+craft knife and ruler if desired) 
* 6" Circle Die Cutter (cut 1 using scrap from lid) 
* Scotch tape
* Dee's Distinctively Snow-covered Tree Die Large 
* 2 6x6 pieces of patterned paper to cut out your tree shapes from 
* 1 6x6 pieces of patterned paper for inside of the box and cut 4 squares at 3x3 each 
* Coordinating cardstock to mount your 3x3 patterned paper squares - cut 2 pieces at 3-1/2"x3-1/2" and cut 1 piece at 3-1/2"x7-1/2"
* High Hopes Stamps Sentiments: Holiday All Year & Magic of Christmas (you can use up to 3 sentiments on the inside if you wish depending on your patterned paper choice.  My paper allowed for 2 sentiments and with the last square I left it blank to put my "To & From" and special Christmas message for the recipient.
* Memento Ink:  Rhubarb Stalk
* Tape Runner
* Best Glue Ever! (love love love this glue!!)
* 1" Sheer Ribbon to wrap around the box and lid twice plus a little to decorate the top of the box as well
* Marianne Design Poinsettia Die
* Red & Green cardstock to make the Poinsettia
* Glue Dots
* 1 Yellow Gem (Rhinestone)
* Embellishments if desired for inside the box

So lets get started now that you have your supplies......

Step 1)  Build your Box Base:  Using your 12x12 cardstock piece and your Scor-Pal, score at 4" and 8".  Turn your paper once and score again at 4" and 8" again.  You should see 9 squares on your 12x12 cardstock - see photo below....

Step 2)  Cut out using either scissors or your craft knife and ruler, the 4 outside corners of your scored 12x12 cardstock - see photo below....

Step 3)  Build the Box Lid:  Using your 6-1/8"x6-1/8" cardstock and your Scor-Pal, score each side at 1" all around the square - see photo below....

Step 4)  On 2 ends of the scored 6-1/8"x6-1/8" cardstock, cut to the cross score lines, then score over.  Add Scor-Tape to the ends of the long cut areas and to the scored over short pieces at the bottom, this step will secure your lid - see photo below....

Here is a look at the completed lid (upside down)....

Step 5)  Making your tree:  Take your 6" circle and fold in half.  Cut along the folded line with either your paper trimmer or scissors so that you have a half circle.  Then take your half circle and form into a cone and secure with Scotch tape - see photo below....

Step 6)  Using your 4 sets of Dee's Distinctively Snow-covered Tree, starting with the larges pieces of the cut outs put tape runner or Best Glue Ever! on the backside and stick evenly around the bottom of the cone.  Be sure to have some of the tree "boughs" extend past the cone as this will be how you will stick your tree to your box.  Continue this step with each layer of the tree till you reach the top - see photo below with the die, patterned paper I used and also the covered cone (tree)....

Here is a closer look at the completed tree....
 
Step 7)  Decorating the outside of the box & lid:  Attach ribbon to the box on the outside and secure on the inside with Scotch tape.  Be sure to match up the ribbon lines on both the lid and box so that when the box is assembled it looks like the ribbon is all in a line and has a "wrapped" look.  The reason this step is completed now is so that when you complete the inside of the box your 3x3 mounted squares will cover up the ends of the ribbon and Scotch tape.
 
Step 8)  Poinsettia:  Cut and create your poinsettia for the top of the lid.  I used glue dots to layer the petals of the flower then I added a gem to the center of the flower.  Add Ribbon strips or loops to decorate under the flower if desired and attach to the top of the lid using Best Glue Ever! - see photos below of the top view....

Side view of the Poinsettia....

 
Step 9)   Decorating the inside of the box:  Stamp all your sentiments on your decorative 3x3 paper as desired - see photo below....

Step 10)  Attach the 3x3 squares to the mounting cardstock - see photo below....

Step 11)  Attach the mounting cardstock with your decorative paper to the back part of the inside of the box.  I decided to create a "wall" for my box, then attach the two remaining squares to the inside of the box - see photo below....

Step 12)  Attach the tree to the center of the box base:  Using Best Glue Ever! put glue to the rim of the cone inside the tree and on the over hanging boughs of the tree and attach to the center of the box base.  Embellish the base around the tree if desired with presents, snowflakes, etc.

And here is your Exploding Christmas Tree Box/Card all wrapped up to give away....

See completed project below....

Thank you for sticking with me till the end and I hope that you enjoyed today's tutorial and will give it a try. I would love to hear what you thought of this project!

Until Next Time, Keep Crafting & Merry Christmas!
Hugs;
 

Friday, June 21, 2013

Carousel Card Tutorial

Hello and happy Friday!  Today is a special post for me as I am going to share with you a tutorial on how to create a "Carousel" Card.  What I love most about this type of card is that it is a gift all on it's own for whom ever you create it for, I guess you could say it is a mini book card.  When I was creating this card I used my favorite colour, adorable images and sweet sentiments.

I am going to forewarn you that this post is going to be VERY picture heavy.  I am not a videographer so I decided to make my tutorial using photos - I sure hope you enjoy it and I would LOVE to hear your thoughts after you have had a chance to check it out!

What made me want to make this card is this amazing Marianne Design Card Carousel Die that Lora sells in the One Crazy Stamper store, here is a photo for you to see what the die looks like...
 This great Craftable Carousel die will give you the opportunity to make unbelievable cards. You can make a full circle (which is what I have to show to you today using the largest of the dies), half a circle, or just a quarter. The possibilities are endless!

Here are photos of the tools and supplies that I used to create this amazing card....
 
Supplies Used: * Whimsy Wee Stamps - Rosetta, Flower Fairies & Ruby  * DoCrafts Wellington 8x8 Stamp Set  * Your Next Stamp, Watnot Sentiments  * Stampabilities True Friends Sentiment  * High Hopes Thinking of You Sentiment  *  Menento Inks - Tuxedo Black, Rich Cocoa & Rhubarb Stalk  *  Copic Xpress It Paper  *  Copic Sketch Markers (colours used listed below)  *  Scor-Pal 1/8 Scor Tape  *  Scor-Pal  *  Bazzill Basics Simply Smooth White Cardstock (for card Base & carousel)  * Squishy Scissors (for intricate cutting)  *  Quickie Glue Pen  *  Fairy Dust Glitter, Sugar Shimmer  *  Glue Dots  *  Marianne Design Card Carousel Die * Spellbinder Die - Blossoms Three  *  My Favorite Things Die-Namics - Flag Stax, Flag Stax Layers & Flower Trio  *  Sheer Ribbon * Pink Shimmer Card Stock  *  Patterened Papers:  MME 6x6 Pads - Love Me & Indie Chic Safron + Lost & Found 6x6 - Blush  *  Various Sentiments to match your theme  *  ATG  *

Directions:
* To start off you will need to cut out your card base, cut 2 @ 10-1/4 x 6 + 1 @ 6 x 5-1/8

* You will need to choose your paper(s) and cut 10 @ 5-3/8 x 4-3/8.  I chose 5 different co-ordinating papers and cut 2 of each.

*Choose 4 images and 4 sentiments + a cover sentiment or decorative- I also chose to put a "handmade by" stamp on the back of the card.  The reason I did not put an image on the front and chose a sentiment instead is because when the carousel is opened the front and back of the card is not seen.  Also I chose a Spellbinder set that co-ordinated with my images and also had a few different size selections that I used throughout the whole card for a uniform look (I am a little anal that way if you have not noticed)
 
*Next you will need to cut out 4 pieces of the Marianne Design Card Carousel Die - see picture below....

*Using your ScorPal, score where I have noted on the bottom right die cut in the picture above.
 
* Next I put my card 2 large pieces of the cardbase together on top of each other and the smaller piece in the center of the "book", then  I placed all my patterened papers on the the card bases in the order that I wanted them to be seen on the carousel.  Be sure to attach a piece of ribbon on the underside ofthe front andback pieces of paper so as to create the tie to close the card.
 
*Once you have on your papers, add your "flower"anchors where two pages of the book join to keep each page attached to each other (this step can been seen on each page showing an image below).
 
*Next you will want to add your sentiments and coloured images to all the remaining pages.  Dont forget to add a "Handmade by" on the back cover!
 
*Once you have all your indsides completed, add adhesive to the small scored tabs of the carousel die pieces and attach to each section of the insideofthe book.
 
Below I have pictures to show you of each completed step of my book!  Copic colours used on all images will be listed at the end of this post for your refference if interested.
 
*My outside cover using the wonderful sentiment from DoCrafts Wellington 8x8 Stamp Set....
 
*Below is page one & two of my book...

*Here is a close up of the High Hopes Sentiment that I used on page 1....

*Here is a close up of the Whimsey Wee Stamps Rosetta with a paper pieced vest, that I used on page 2.  I did 3D effect the larges flower as well...


*Below is page 3 & 4 of my book....

*Here is a close up of the Whimsey Wee Stamps Flower Fairies (#1) with a paper pieced dress, that I used on page 3....

*Here is a close up of the Your Next Stamp Whatnot Sentiment that I used on page 4....

*Below is page 5 & 6 of my book....

*Here is a close up of the Stampabilities True Friends Sentiment that I used on page 5....

*Here is a close up of the Whimsey Wee Stamps Flower Fairies (#2) with a paper pieced dress, that I used on page 6....
 
*Below is page 7 & 8 of my book....
 

*Here is a close up of the Whimsey Wee Stamps Ruby with a paper pieced vest, that I used on page 7....

*Here is a close up of the Your Next Stamp Whatnot Sentiment that I used on page 8 - this is also where I will write a little some thing to the recipient of the beautiful book/card....

*This is the back cover ofmy book that I decided to put a "Handmade By" sentiment to finish off the project.  Tie up the book with a pretty little bow and voila!...


*Here is a view of the book before it is tied into the carousel....

*Here is what the full carousel card looks like when opened and tied on the side - pictures sure do not do this justice so hope you get the jist of it....
Copic Colours used on all Images:  *Skin-E11, E00, E000 *Dark Hair-E49, 59, E25, E50  *Lighter Hair-E29, E27, E23, E50  *Pinks-R56, R85, R83, R81, RV10, RV000  *Greens-G24, G21, G20  *Other-E40, E23
 
Well, that is my tutorial I prepared for you, I hope that you will give it a try as I am sure you will see a few more of these on my blog in the future because they are soooo much fun to make!  I would sure love to hear your thoughts on this fun card if you have time =)
 
Until Next Time, Keep Crafting!
Hugs;