Showing posts with label Whimsy Stamps. Show all posts

Friday, April 17, 2015

A Mother's Day Card.

Hello and Happy Friday!  Today I have a card to show to you that I made for my Mom for Mother's Day, hope you like it....

Here is a look at the inside of the card....
 Supplies Used:
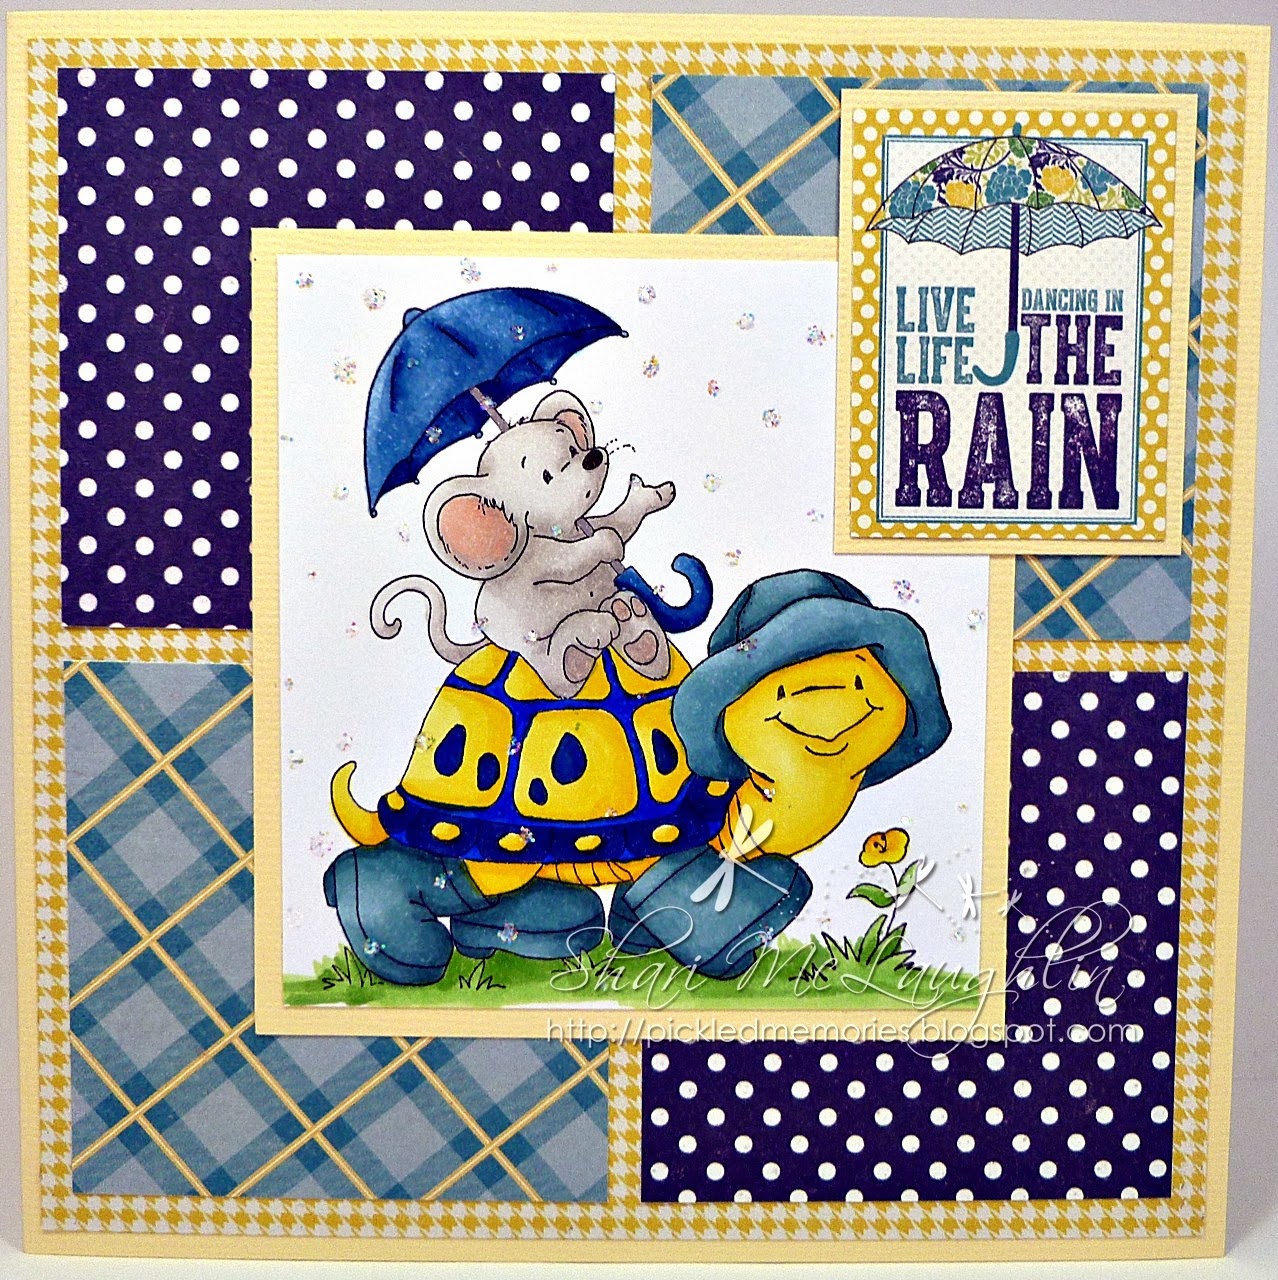
* Image:  C.C. Designs, Freckles
* Copic Xpress It Cardstock
* Copic Sketch Markers
* Memento Inks:  Tuxedo Black & Rose Bud
* Paper:  Wild Rose Studio 6x6 Paper Pack, Bella
* Sentiments:  Whimsy Stamps Sentiment Collections, For The Woman In our Lives
* Spellbinders:  Classic Circles small & Large + Scalloped Circles
* Your Next Stamp Die:  3D Banner Set
* Mini Blending Tool
* Glossy Accents
All above listed supplies can be purchased at the OCS Store

Here is a look at the beautiful little Freckles to see the Copic colours used....
 Copic Colours Used:
* Skin:  E13, E11, E00, E000
* Hair:  YR24, Y26, YR21, Y13
* Pinks:  R85, R83, R81, RV10
* Whites:  C3, C1,C00, 0

I hope that you enjoyed today's card and that I may have inspired you to enter into this months challenge.
 
 
Until Next Time, Keep Crafting!!
Hugs;

Friday, March 28, 2014

Whimsy Stamps - Think Spring Bunnies

Hello and Happy Friday!!!  Next month as you know is Easter so today I have a card to show you that I made for my parents for Easter using the new Whimsy Stamps Think Spring Bunnies....
As you can see on the sign I changed it from "Think Spring" to "Just For You"!  Since it is easy to change out the words it makes this stamp so much more usable!
 

Here is a look at the inside of the card....
 Supplies Used:  *Image:  Whimsy Stamps - Crissy Armstong's Think Spring Bunnies  * Copic Xpress It Cardstock  * Copic Sketch Markers  * Memento Inks:  Tuxedo Black, Rose Bud & Dandelion  * Sakura Clear Glaze Pen  * Sakura Clear Star Pen   * Best Glue Ever!  * 3D Pop Dots  * Pearl Gems - Dainty  *

Here is a close up of the adorable little bunnies to see the Copic colours used....
 Copic Colours Used:  * Bunnies: E49, E47, E44, E43, E42, E41, E40  * Ear & Nose: RV10, E40  * Sky: B000, B0000, 0  * Grass & Leaves: G46, G43, G40  * Flowers: Queen & Co. Jewels + Dress It Up  * Butterfly: V17, V12  * Fly: Sakura Clear Star Pen   * Sign: Y15,Y13, Y11  *

I hope that you enjoyed today's card and maybe I have inspired you to crate an Easter project of your own =)


Until Next Time, Keep Crafting!
Hugs; 

Tuesday, March 25, 2014

Life's a Beach

Wow, another month has flown by, but you still have a few days left this month to enter the One Crazy Stamper challenge of Anything Goes with any stamped image - no digital images are allowed!!
For the entire month the design team has been featuring images from our sponsor company - WHIMSY STAMPS, and my card today has a wonderful Elisabeth Bell image called Beauty.

Once again I have used Copic sketch markers to color the image, and then I used a Sakura Stardust pen to add highlight to the mermaid tail ( you probably can't see the shine of the fins, but it looks great ! ). I used my Grand Calibur and a Grand die to cut the shape of the card, then layered paper from Authentique's Renew collection for added color. The ribbon and sentiment are from my stash.
Card Recipe
Tail - BG70, BG72, BG75
Skin - E00, E01, E02
Shirt & Shell in Hair - Y000, Y02, Y06
Hair - E13, E15, E19, YR24
Sakura Stardust pen
Have a great day, and be sure to enter One Crazy Stamper's challenge this month to win a fabulous prize.

Friday, March 21, 2014

Your a Star!

Hello and Happy Friday!  I sure hope that you had a great week!  Today I have a super cute Birthday card to show you, hope you like it, I challenged my self not to use patterned paper so I decided to emboss the background image and add die cuts to embellish...
Supplies Used:  * Image: Whimsy Stamps, Shy Girl  * Copic Sketch Markers  * Copic Xpress It Cardstock  * Sentiments: Whimsy Stamps, Everyday Moments  * Zig Wink of Stella Brush, Clear (on top of purple die cut stars)  * Glossy Accents (on eyes, shoelaces, black on the shoes and outside sentiment)  * 3D Pop Dots  * Zig Glue Pen  * Memento Inks: Tuxedo Black  *

Here is a look at the inside of the card....

 Here is a close up of the beautiful image to see the Copic colours used....
 Copic Colours Used:  * Skin: E11, E00, E000 * Hair: E49, E59, E25, E50 * Eyes: E59, E23 * Purple: V17, V15, V12 * Black: T8, T6, T4 *


This was such a fun image to work with and I hoped you liked today's card.


Until Next Time, Keep Crafting!
Hugs;

Tuesday, March 18, 2014

Lucky Friends

Terrific Tuesday time is here again, and I have another Whimsy Stamps image colored and made into a card to show you today. This is Beau and Bashful from Whimsy stamp artist Sylvia Zet, that I have stamped with Memento Tuxedo Black ink on to Copic Xpress It cardstock, and then colored with Copics.

Once the image was colored I used several of the Spellbinders Scalloped Circles and Grand Calibur dies to cut and make the card shape. The ribbon and flowers are from my stash, dp is from Dovecraft, and the sentiment is from Whimsy Stamps.
Card Recipe
Unicorn - E30, E31, E34
Horse - E50, E51
Mane - RV11, RV13, RV14
Flowers - RV11, RV13, YR23
Basket & Centers of Flowers - G12, G14, G16
Ground - E33


Don't forget to check out the rest of the design teams wonderful Whimsy Stamps cards, and then enter your project into the monthly challenge at here at One Crazy Stamper. The challenge theme is show us your project using anything goes with a stamped image, just no digital images please!

Friday, March 14, 2014

Picture Perfect!

Hello and Happy Friday!  Wow what a week we had here in Southern Ontario!  I sure hope that you are dug out of all the snow that was dummped on us! 

Today I have an altered item  - a wooden picture frame to show you that I made using the wonderful new stamp set from Whimsy Stamps called, Ciara &Sandy

As soon as I saw this image I thought of me and my baby girl Lilli, so I went ahead and coloured the image like us.  I purchased a raw wood frame and I stained the outside edges with Memento Toffee Crunch and then covered the frame with paper using the Best Glue Ever! to attach the paper to the wood frame and here is what I came up with to put in my living room on display....
Supplies Used:  * Image: Whimsy StampsCiara &Sandy  * Glossy Accents  * Your Next Stamp Fishtail Banner Dies   * Your Next Stamp Letter Board Die* Bazzill 12x12 Champagne  * Memento Inks: Tuxedo Black, Toffee Crunch & Rhubarb Stalk  * Copic Sketch Markers  * Copic Xpress It Cardstock  * Pearls  * Squishy Scissors (LOVE these scissors!!!)  * Best Glue Ever!  * Xyron  *

Here are some closeups to see the sentiments and Copic colours used better, as you can see I have added Glossy Accents to the "Best Hugger Award" circle, the girls glasses, the tongue, dogs nose & eyes....
 
 
Copic Clours Used:  * Skin: E11, E00, E000, E0000 * Hair: E34, YR24, Y26, Y21, Y11 * Reds: R39, R37, R35 * Blues: B99, B97, B95  * Greys: C3, C1, C0 * Dog: R22, R21, R20, E41, E50, E40, 0 * Best Hugger: E43, E42, R39, R37, R35  *

I sure hope that you enjoyed today project!
 
 
Until Next Time, Keep Crafting!
Hugs;


Tuesday, March 11, 2014

Hey Girlfriend!

Time to present another card for One Crazy Stamper and this month we are featuring the wonderful stamps from Whimsy Stamps. Whimsy carries many different artists stamps and I love them all!! The challenge theme is ANYTHING GOES WITH A TWIST - your project must include a Whimsy Stamp rubber stamp image - no digitals allowed!! 

My card today features another adorable image from a new Whimsy Stamps artist - Time for Tea Designs - and is called "Shopping Day". I have colored the image with Copics, then mounted the finished image on dp from My Mind's Eye Notable collection. Prima flowers finish the card front.
Card Recipe
Pants, Hat, Scarf in Bag - BG02, BG05, BG07
Shirt - YR16, E08, YR18
Skin - E000, E00, E01
Scarf, Bag - YR21, YR23, yr24
Bag, Shoes - E40, E41, E42
Hair - E74, E77, E79
Background - BG0000
Dots - BG01, YR20
Sakura White Glaze Pen for dots
Ground - YR20

Monday, March 10, 2014

Pretty Kitty

Thank you for stopping by to check out what I am show casing today for One Crazy Stamper.  The stamps we are having so much fun sharing with you this month are Whimsy Stamps. 
Whimsy Stamps
Today I am using on my card "Pretty Kitty" by Elisabeth Bell.  So much fun to color and create my card with. 
Pretty Kitty EB1055
Please join us at One Crazy Stamper for the challenge this month using these fantastic stamps from Whimsy Stamps.  Also if you are in need of some great supplies for your craft room, please check out Lora's store at One Crazy Stamper for all you crafty needs.  Till next time, Happy Crafting.
I used the following supplies: Stamp-Whimsy Stamps-Pretty Kitty, Bo Bunny Pattern Paper, Spellbinder Dies, Flowers, Pearls, Foam Tape, Ribbon, Xpressit Cardstock, Copic Markers-R12, YR18, YR16, E08, R22, R20, R24, YG17, BG75, BG78, BG72, R32, C3, C5, C7, C9, E25, E21, E11, E13.

Tuesday, March 4, 2014

The Rain

Welcome to Terrific Tuesday for One Crazy Stamper and my next card from our sponsor this month - WHIMSY STAMPS!! This adorable image is from the Crissy Armstrong collection of images and is entitled I Will Carry You!

I stamped the image with Memento Tuxedo Black ink on Copic Xpress It cardstock, then colored with Copic Sketch Markers. The dp for the card front and interior are form My Mind's Eye Oxford Lane collection - that is also were the sentiment came from. I added Stardust Stickles to replicate raindrops which added the final touches to the card front.
Card Recipe
Hat/ Boots - BG72, BG75, BG78
Turtle Body/Markings on Shell - Y02, Y06, Y08, Y17
Shell Borders - B29, B39
Grass - YG13, YG17
Umbrella - B34, B37, B39
Flower - Y17, Y06
Mouse - W0, W2, W4
Nose - W8
Inside of Mouse Ears/Pads of Feet - R20
Umbrella handle - Silver Metallic pen
Don't forget that the theme this month is the ever popular ANYTHING GOES, but with a BIG TWIST - you must use a Whimsy Stamps image and it can not be a digital image! Check out all of the details by clicking on the icon at the top of this page!

Sunday, March 2, 2014

Denise and Whimsy Stamps

Denise from Whimsy Stamps has another card to showcase.


Do enter this month's challenge for a change to win a prize package from Whimsy Stamps.  Remember, even though the challenge is "Anything Goes" you can only use rubber Whimsy Stamps.

Wednesday, December 11, 2013

Party Penguin

Hello there.  Well we are exactly two weeks away from the big day.  Are you ready?  I can truthfully say I am almost ready and most of what I have left to do are little things.

Today's card once again follows our December theme of "WINTER/HOLIDAY".  My niece's son has a birthday two days before Christmas and this is for him ~ a partying penguin by Whimsy Stamps Meljen's Designs.


Supplies Used:  Copic Xpress It Blending Card StockMemento Tuxedo Black InkWhimsy Stamps Meljen's Designs "Party Penguin", Copic MarkersGlossy Accents

A close up of the image:


Copics Used:  B32, B34, B37, B39, BG10, BG11, BG13, Bg15, E50, E51, E81,Y11, Y13, Y15, YR02, YR04, YR07W1, W3, W5, W7

Thanks for coming by once again.  I hope we continue as a design team to inspire you to be as creative as you can be.  So, until we meet again, happy Wednesday and keep crafting.

Hugs,

Tuesday, November 19, 2013

Put A Little Joy In YourLife

If you are a regular to my blog, you will know that I adore penguins - big, small, cute and fluffy, just as long as the image is a penguin I will own it!!!  So for today's post for One Crazy Stamper I have used my Copic markers to color up this super cute Whimsy Stamps image "Penguin Joy"

 
After coloring the image I added Red Viva Décor Pearl Pen to the berries, and white Liquid Applique and Snowdust Stickles to add more dimension and shine.  The card front features designer paper from Carta Bella's So This is Christmas collection.
 
Card Recipe -
Greens - G21, G24, G28
Reds - R27, R39
Sign Backgrounds - E81, E84
Hat and Gift - E40, E41, E43
Beaks and Feet - YR20, YR21, YR24
Face/Tummy - N0, N2
Body - N5, N7, N9
 
Please check out the fabulous One Crazy Stamper challenge - the theme this month is "CHRISTMAS", and you still have until the end of the month to enter to win a couple of great stamps.  Leave some love for the entire design team, and check out all of the wonderful products available at the online store.


Friday, October 25, 2013

Did you know... It Is Only 2 Months Till Christmas!!!

Hello and Happy Friday!  Since today is the 25th of the month that means that it is only 2 months until Christmas so I decided to show you a Christmas card to celebrate the countdown to the big day!

Today I not only have an adorable image to show you that I am very proud of how the colouring turned out, as well as a technique that you may not have tried yet and is easy to incorporate into your card making and scrapbooking - Glitter Ritz!
On this card all the red accents you see (the scalloped circle and the outline of the sentiment) were all done using Glitter Ritz to help make the card sparkle!

Here is a look at the inside of the card...
 
Here is a close up of the image to see the Copic colours used....
Copic Colours Used:  * Skin:  E11,E00, E000  * Hair:  E37, YR24, Y26, Y21, E50  * Greens:  G28, G24, G21, G20  * Kitty:  E37, E35, E34, E31, E30,R21, R20  * Red:  R89, R39, R37, R35  * Whites:  C3, C1, C00 + Fairy Dust Sugar Shimmer Glitter  *

Here is an angled view to see the glittered areas a little better and to see the Glitter Ritz effect on the scalloped boarder....

So with only 2 months till Christmas, have I inspired you to get started on your Christmas cards too?


Until Next Time, Keep Crafting!
Hugs;

Tuesday, October 22, 2013

Give Thanks

Today's card features another beautiful image from Whimsy Stamps Wee Stamps artist Sylvia Zet, and displays this months challenge theme for One Crazy Stamper of Thanksgiving or Halloween.
The image is Wyanet available here and I have used Copics to color her. The image was then cut and matted with a Spellbinders die, and then mounted on paper from My Mind's Eye. Butterfly dies from Cherry Lynn, and floral flourishes from Memory Box frame the image.  The butterflies received a coat of Icicle Stickles, and the beads and star on her outfit have Turquoise Viva Decor Pearl Pen accents.
Card Recipe -
Hair - E 44, E47, E49
Outfit - YR21, YR23, YR24
Skin - E21, E11, E13
Purples - BV02, BV04, BV08
Turquoise - BG72, BG75, BG78
Rock - W4, W6, W8
Sky - BG11, YR31, RV63, Colorless Blender
You still have over a week to enter the monthly challenge here at One Crazy Stamper to win a fabulous prize - check out all of the details by clicking on the icon at the top of this blog.


Tuesday, October 15, 2013

A Very Scary Sight!!!

Wow, hard to believe but it's only a couple of more weeks until one of my favorite holidays will be here - I love Halloween almost as much as Christmas - the ghosts and goblins will be out prowling the streets. My card this week features the adorable image Hazel from Whimsy Stamps Wee Stamps collection, and fits the theme for this months challenge at One Crazy Stamper.
I colored the image with Copics then cut it out with a Spellbinders die, then used an Antique Linen Distress Ink pad to color the background. The edges of the die shape were also inked with Memento Tuxedo Black ink. The dp is from My Mind's Eye Happy Haunting collection, which is also where the "Scary" word came from. I used two Memory Box dies to cut the spider web and spider for the corner of the card front. The hints of glitter on the spider were created with a Sakura Star Dust pen.
Card Recipe -
Dress, Hat - V05, V06, V09
Black - N6, N8, N10
Green Hair - YG21, YG23, YG25, YG17
Broom - YR21, YR23, YR24
Oranges - YR02, YR04, YR09
Broom Handle/Browns - E35, E37
Skin- YR00, YR01. BV01
Don't forget to check out the beautiful creations from the rest of the design team and enter the monthly challenge to win a fabulous prize.

Tuesday, October 8, 2013

Fall Beauty

Welcome to another Terrific Tuesday for One Crazy Stamper, and in keeping with this months theme of Thanksgiving/Halloween, I have colored up a gorgeous image from Whimsy Stamps artist Crissy Armstrong.

This image is entitled Crown of Daisies, but I took creative license and choose to color her up in gorgeous fall colors making the daisies resemble sunflowers! I then paired her with the designer paper from Graphic 45's French County collection. The sentiment is from Whimsy Stamps Raindrops Echo Autumn stamp set. Here's the Copic colors that I used on this image:
Skin - E01, E11, E21
Hair - E34, E35, E37
Dress - YR21, YR24, YR27, YR18
Greens - E81, E84, E87
Flowers - YR14, YR15, YR18, E07, E04, YR04

Be sure to check out the rest of the design teams creations and enter to win a fabulous prize at the One Crazy Stamper blog.


Friday, October 4, 2013

Have a Frightfully Fun Birthday!!

Hello and Happy FRIDAY!  Today I have a fun card to show you using a Halloween stamp for a Birthday card!  This card was so fun to create and colour, check it out....

 Aren't these little bats so darn adorable??!!  I set this scene for a night look in the pumpkin patch and I just love how it turned out!  How can anyone be afraid of these adorable Vampire bats?
 
Here is a look at the inside of the card....
Supplies Used:  * Image: Whimsy Wee Stamps, Batty Boo  * Copic Xpress It Card Stock  * Copic Sketch Markers  * Memento Inks:  Tuxedo Black, London Fog & Bamboo Leaves  * 3D Pop Dots  *

Here is a side view to see the 3D effect. As you can see I only "popped" the top portion of the image and attached the bottom of the image flush with the grass....
 
Here is a close up of the adorable image to see the Copic colours used....
Copic Colours used:  * Pumpkin: YR18, YR16, YR14, YR12, YR01, YR000  * Greenery & Ground:  YG67, E44, YG63, YG61  * Pumpkin Eyes and Nose:  YR23, YR21, YR21, Y15  * Bat Bodies:  W9, W7, W5, W3  * Bat Ears:  W3, W1, R11  * Cape (Wings):  N8, N6, N4, N2  * Bowtie & Shirt:  R89, R39, R37, R35, N2, N0  *

I sure hope you enjoyed today's post as much as I enjoyed making it to show to you.  If you would like to see more on this card, please visit my blog here =)

I hope that my card may have inspired you to enter into this month's challenge.  Have a fantastic Friday and I will see you again next week. 


Until Next Time, Keep Crafting!
Hugs;
 

Wednesday, August 28, 2013

A Mini Album/Book Card Tutorial

Good Morning.  As I told you last week, I have a tutorial for you today on how to make a mini album/book card.  This versatile little card/album has many uses ~ a card with wishes on each page, a mini album with pictures on each page and tag, a journalling book on a layout ~ and I will show you how I used mine at the end of the post.  There will be lots and lots of pictures and instruction and if you still have questions. just leave me a comment here or on my personal blog and I will answer.

The first thing you need to make this album is a single piece of 12" x 12" card stock.  This will be your base.

Step 1 ~ Using a scoreboard, score at 2", 6" and 10".


Step 2 ~ Rotate the page and then score at 3", 6" and 9".


Step 3 ~ Fold along all score lines, making the 2" folds into pockets.


Step 4 ~ Cut along middle score line, leaving 3" together.


Step 5 ~ Add score tape to the back of the page that is not cut.  Put this page together.  Next, accordion pleat the other pages to make a book.  Add score tape to the back of these pages to hold together.  Also, add score tape to the open ends of the pockets.


Step 6 ~ Cut tags for the pockets.  Embellish album and tags as desired.  Tie the album closed with a ribbon.


The white and kraft albums were just to show you the steps. Here is a picture of my finished album:


And this is how I used it:


Left side:


Right side:


I used it for a journalling box for a layout.  I have missed scrap booking as I have been making so many cards so I went back to my first love of paper crafting and made a scrap book page.  In keeping with the theme of the month "BIRTHDAYS" this layout showcases my 50th birthday.  I am still looking for a catchy title so if you can think of one, please leave it for me in the comment section.  


Thanks for coming by today.  I hope you enjoyed my tutorial and will try one of these cute little mini albums to send as a card or use for your scrap booking.  Remember, there are just a few more days to enter our challenge for this month "BIRTHDAYS" as we will have a new challenge up on September 1.

Hugs,