Showing posts with label Copic Xpress It paper. Show all posts

Wednesday, March 6, 2019

Party Animals

Welcome OCS Fans!
Sharing a fun card featuring: High Hopes - Wild Party and sentiment High Hopes - Birthday Party Animals! I just love these little characters.
I first stamped the sentiment using Tim Holtz Distress Inks - Dusty Concord and then to emboss it I used some Versamark and Ranger - Clear Super Fine Detail embossing powder. Using my MISTI, made this very easy to do. I decided to add a little bit of bling as well, so I die cut a few small balloons and added them on each side of the sentiment. I also decided to give them some fuzzy pop-poms on their hats to finish them off. Enjoy!
Card Recipe:
Stamps: High Hopes - Birthday Party Animals; High Hopes - Wild Party
Background Paper: Forever In Time Perfect Prints - Party Monsters (6x6 in.)
Inks: Tim Holtz Distress Inks - Dusty Concord, Memento - Tuxedo Black, Versamark
Die Cuts: Your Next Stamp - Mini Balloon Trio Die Set, My Creative Time -Stitched Squares Inside and Out
Tools: MISTI - Most Incredible Stamping Tool, Cuttlebug, Gelly Roll Sakura #8 Pen
Party Animals stamped onto Copic Marker X-Press It Blending Card and then coloured in with Copics:
Dragon: YG01, YG03, YG13, YG17, V04, V06, V09, G14, G17, G07, BV11, BV13, BV17
Moose: E21, E23, E25, E29, E51, E53, E55, E57, BV17, BV13, BV11
Monster: BG02, BG05, BG07, E19, E17, E15, W9, W7, E97, E19, E08
Bear: E31, E33, E35, E37, BG02, BG05, BG07
Monkey: E51, E53, E55, E57, E59, BG15, BG13, BG11, BG05, BG07, BG09
Racoon: Black, W10, W9, W7, C9, C7, C5, C3, C1, G99, G95, G94
Horn: E15, Y28, YR6, YR24
Mouths: EE95, E93, R17
Background:  BV0000
Balloons: G14, G17, G07, BG02, BG05, BG07
Confetti: YG13, YG97, YG93, BV00, BV02, BV04, BV11, BV13, BV17, Y19, Y17, Y15
Be sure to visit the One Crazy Stamper blog for your daily inspiration, and check out our Facebook page, Pinterest and Twitter as well!

Friday, June 20, 2014

Happy 45th Anniversary Mom& Dad!

Hello and Happy Friday! Today I have a very special card to share with you. It is a card I made for my Parents for their 45th (Sapphire) Wedding Anniversary that they are celebrating tomorrow on the first day of Summer!
 

Supplies used:
* Embossing Folder: Cricut Cuttlebug Polka Dots
* Memento Ink: Tuxedo Black & Dunabe Blue


Here is a close up of the image see the Copic colours used....
 Copic colours used:
* Stem & Ground:  G29, G28, G24
* Flower:  B259, B28, B26, B24
* Tilly:  N8,N6, N4, N2,N0 (coloured like my furbaby Casey)

I hope that you enjoyed today`s card.


Until Next Time, Keep Crafting!
Hugs;

Friday, January 17, 2014

Your Next Stamp, Smiley Happy Critter Crew Set

Hello and Happy Friday!  Today I have two very fun cards to show to you that I made using two of the images from the "Your Next Stamp, Smiley Happy Critter Crew Set".

The first card is using the cute little frog from the set....
 
Here is a look at the inside of the card....
 Supplies Used:   * Your Next Stamp, Smiley Happy Critter Crew Set  * Your Next Stamp, Puffy Cloud Die  * Your Next Stamp, Flower Fun Spring Grass Die  * Your Next Stamp Happy Day Sentiments  * High Hopes Rubber Stamps, Hoppy Birthday sentiment  * Copic Xpress It Cardstock  * Copic Sketch Markers  * Action Wobble  * Bazzill Cardstock, Skylar  * 3D Pop Dots  * Memento Inks: Tuxedo Black & Bamboo Leaves  * Sakura Clear Glaze Pen  * Glossy Accents  *

Check out the Action Wobble in action!....

Here is a close up of the image to see the Copic colours used....
  Copic Colours Used:  * Greens: YG67, YG17, YG03  * Reds: R24, R22 + Sakura Clear Glaze Pen  * Browns:  E87, E84, E81 + Sakura Clear Glaze Pen  * Crown: YR24, YR23, YR20 + Sakura Clear Glaze Pen  * Eyes:  Glossy Accents  *

My second card I have made is using the adorable little Lady Bug....
 
Here is a look at the inside of the card.... 
 Supplies Used:   * Your Next Stamp, Smiley Happy Critter Crew Set  * Your Next Stamp, Puffy Cloud Die  * Your Next Stamp, Gumdrops- Black  * Your Next Stamp, Gumdrops- Holly Berry  * Your Next Stamp, Whatnot Sentiments One  * Copic Xpress It Cardstock  * Copic Sketch Markers  * BoBunny 6x6 Head Over Heels  * 3D Pop Dots  * Memento Inks: Tuxedo Black  * Sakura Clear Glaze Pen  * Googlie Eyes  *

Here is a close up of the adorable image to see the Copic colours used....
 Copic Colours Used:  * Reds: R24, R22  * Blacks: T8, T6, T4

Well I hope you enjoyed both cards today!
 
Until Next Time, Keep Crafting!
Hugs; 

Wednesday, December 11, 2013

Party Penguin

Hello there.  Well we are exactly two weeks away from the big day.  Are you ready?  I can truthfully say I am almost ready and most of what I have left to do are little things.

Today's card once again follows our December theme of "WINTER/HOLIDAY".  My niece's son has a birthday two days before Christmas and this is for him ~ a partying penguin by Whimsy Stamps Meljen's Designs.


Supplies Used:  Copic Xpress It Blending Card StockMemento Tuxedo Black InkWhimsy Stamps Meljen's Designs "Party Penguin", Copic MarkersGlossy Accents

A close up of the image:


Copics Used:  B32, B34, B37, B39, BG10, BG11, BG13, Bg15, E50, E51, E81,Y11, Y13, Y15, YR02, YR04, YR07W1, W3, W5, W7

Thanks for coming by once again.  I hope we continue as a design team to inspire you to be as creative as you can be.  So, until we meet again, happy Wednesday and keep crafting.

Hugs,

Wednesday, November 20, 2013

Merry Christmas, Eh?

Hello there.  Thank you for dropping in today to see what I have created for you.  It is, of course, following our challenge theme of "CHRISTMAS" this month, a Christmas card using an image and sentiment from High Hopes Stamps.  I made it for an American friend who believes that all we say in Canada is "EH?"  While I know I may have said it a time or two, it is not something I say continually or is it something I recall hearing all the time.  But it is a cute stereotype and works well here.


A close up of the image:


Copics Used: B000, G03, G05, G07, R22, R24, R29. YG93, YG95, YG97, YR02, YR04, YR07, W3, W5, W7

You still have time to enter the November Christmas challenge for your chance to win 2 stamps from Wild Rose Studio.  I have enjoyed seeing what everyone has made so far.

Have a wonderful Wednesday.

Hugs,

Wednesday, September 4, 2013

Elegant Santa

Good Morning.  Welcome to "Wonderful Wednesday" here again at One Crazy Stamper.  As we have all mentioned, for the month of September, myself and my design team sisters will be showcasing the Christmas release from High Hopes.  I have a card to show you today using Elegant Santa.  I see this Santa from the Victorian era so paired him with colours and a sentiment to match that.


A close up of the image:


Copics Used:  Skin ~ E00, E02, E11, R20; Hat ~ G21, G24, G29, R24, R37, R39, R89, YR21, YR23, YR24; Beard Shadows ~ W1, 0

Thanks for dropping in today.  Two reminders ~ our blog hop is Sept 10th with lots if inspiration and prizes and you can enter our September "CHRISTMAS' challenge with a card of your own.

Hugs,


Wednesday, August 21, 2013

Thank U

Hello.  Well another Wednesday has rolled around and it is my turn to show you a project here on the One Crazy Stamper blog.  I was asked to make a card for someone to give to their little girl's baseball coach at the end of the season.  She wanted it both girly and sporty and I think this fit the bill.


Supplies Used:  Copic Xpress It Blending Card StockMemento Tuxedo Black InkSaturated Canary "Lil Pitcher", Copic MarkersEcho Park Here and Now 6" x 6" PadGlossy Accents

A close up of the image:


Copics Used:  Skin ~ E00, E02, E11, R20; Hair ~ E35, Y21, YR23; Clothes ~ E40, E42, E43, R81, R83, R85, R56; Shoes ~ W3, W5, W7; Pitcher's Mound ~ E33, E35, E37; Grass ~ G21, G24, G29

Thanks for coming by today.  You still have a couple of weeks to join us for our "BIRTHDAY" celebration and you could be a guest designer with us.  Please come back every day to see what my amazing design team sisters have created!  Join me next week as I will have a tutorial for you.  And, coming up, we are going to have a blog hop showcasing new Christmas stamps from High Hopes complete with prizes.

Have a wonderful day.

Hugs,


Wednesday, August 14, 2013

Golfer Glen

Hello.  Glad you could make it today for another "Wonderful Wednesday".  The style of card I have today is one that I, along with many card makers, struggle with.  It is a masculine card.  I will gladly use all shades of pink, purple, flowers, lots of bling and pretty flourishes to decorate a card.  But what happens when not one of those things can be used?  I guess you could say my "go to" things for masculine cards are metal, buttons and twine.  All three have been used on this birthday card which follows our theme for the month of August.


Supplies UsedCopic Xpress It Blending Card StockMemento Tuxedo Black InkHigh Hopes "Golfer Glen"Copic MarkersBazzill Basics Textured Card StockHigh Hopes "Golf Saying"Whimsy Stamps "Birthday Greetings"Tim Holtz Tea dye Distress Ink

A close up of the image:


Copics Used: Skin ~ E00, E02, E11, R20; Hair ~ W1, W3, W5; Clothes ~ BG75, E43, E44, E47. YR02, YR04, YR07; Shoes ~ E40, E41, E42, E43, E44, E47; Bird ~ B39, B41, B45,; Club ~ C3, C5, C7

Thanks for coming by.  Just a reminder of two things ~ our challenge for this month is "BIRTHDAYS", you could be a guest designer for OCS just by entering and, local ladies, there are some great new classes and an all day crop happening in September.  See all the details in the above pinned post for the challenge. And check the website for the classes and crop.

Until next time, keep crafting.

Hugs,


Wednesday, August 7, 2013

Just Ducky

Hello y'all.  I am glad you could come by for another "Wonderful Wednesday" here at One Crazy Stamper.  I hope the card I have to show you today just brings a smile to your face no matter how you are feeling.  It is a perfect card to post on a rainy day here.

I have used an image from the High Hopes stamp line which is such a versatile line I am sure there is something for everyone no matter what your taste.


A close up of the image:


Copics Used:  Duck ~ Y11, Y13, Y15, YR03, YR04, YR07; Umbrella and Hat ~ BG11, BG13, BG15, YG03, YG17, YG67; Ladybug ~ R35, R37, W7; Puddle ~ B21, B24, B26, B39; Sky ~ B000, 0

Thanks for stopping by today.  Don't forget about our birthday challenge going on this month.  See the pinned post at the top for all of the details.

Hugs,


Wednesday, July 10, 2013

Red Hat Girl

Good Morning and welcome to another Wonderful Wednesday.  It is my turn to once again post here today and I have a card using the new line of stamps called My Besties.  I was inspired to make this card because the hat reminded me of the red hat society.  I did a little research and this is what I found out about the beginning of the society :

The founder of the Society is artist Sue Ellen Cooper, who lives in Fullerton, Orange County, California. In 1997, Cooper gave a friend a 55th birthday gift consisting of a red bowler purchased at an antique store along with a copy of Jenny Joseph's poem "Warning". The opening lines of the poem read:


"When I am an old woman I shall wear purple
With a red hat that doesn't go and doesn't suit me."

Originally the society was open for only women over 50, but now is open to all women.  Sounds like a fun time with girlfriends :)

Here is the card:


A close up of the image:


Copics Used:  Skin ~ E00, E02, E11, R20; Hair ~ E55, Y21, YR23; Clothes ~ 0, BV02, BV04, BV08, R32, R35, R37, W1, W3; Hat ~ BV02, BV04, BV08, G29,R32, R35, R37; Shoes ~ E40, E42, E43

Thanks for dropping in today.  Don't forget our challenge this month to use the colour kraft.  See the above pinned post for details.

Hugs,

Friday, June 28, 2013

Just Motoring By with a Birthday Hi!

Hello, and Happy Friday! Today I have a fun card to show to you that I made for my very good friend Gary. My friend Gary LOVES to ride his motorcycle and when I saw this image I thought of him right away and just waiting for his Birthday to come around to make him a card, check it out....
Here is a look at the inside of the card....
SUPPLIES USED:  *High Hopes Stamps, Maurice  *Memento Inks: Tuxeto Black, & Rhubard Stalk  *Outside Sentiment: High Hopes Stamps, Just Motoring By  *Inside Sentiment: High Hopes Stamps, Growing Old & MFT Piggy Bank *Copic Xpress It Papers  *Copic Markers  *3D Pop Dots  *Cloud Die: Crealies Dies  *Blue Cardstock: Bazzill, Blue Bell
Here is a close up of Maurice to see the Copic colours used - I just love how the texture turned out on the moose....
COPIC COLOURS USED:  *Reds: R59, R39, R37, R35  *Blues: B99, B97, B95  *Yellows: YR24, YR23, YR21  *Greys: C5, C3, C1, C00  *Blacks: T10, T8, T6  *Moose: E37, E35, E33, E31, E30  *Hoofs: E59, E57  *Seat: T6, T4, T2
Well that is all for today, hope that you enjoyed today's card!
Until Next Time, Keep Crafting!
Hugs;

Friday, June 21, 2013

Carousel Card Tutorial

Hello and happy Friday!  Today is a special post for me as I am going to share with you a tutorial on how to create a "Carousel" Card.  What I love most about this type of card is that it is a gift all on it's own for whom ever you create it for, I guess you could say it is a mini book card.  When I was creating this card I used my favorite colour, adorable images and sweet sentiments.

I am going to forewarn you that this post is going to be VERY picture heavy.  I am not a videographer so I decided to make my tutorial using photos - I sure hope you enjoy it and I would LOVE to hear your thoughts after you have had a chance to check it out!

What made me want to make this card is this amazing Marianne Design Card Carousel Die that Lora sells in the One Crazy Stamper store, here is a photo for you to see what the die looks like...
 This great Craftable Carousel die will give you the opportunity to make unbelievable cards. You can make a full circle (which is what I have to show to you today using the largest of the dies), half a circle, or just a quarter. The possibilities are endless!

Here are photos of the tools and supplies that I used to create this amazing card....
 
Supplies Used: * Whimsy Wee Stamps - Rosetta, Flower Fairies & Ruby  * DoCrafts Wellington 8x8 Stamp Set  * Your Next Stamp, Watnot Sentiments  * Stampabilities True Friends Sentiment  * High Hopes Thinking of You Sentiment  *  Menento Inks - Tuxedo Black, Rich Cocoa & Rhubarb Stalk  *  Copic Xpress It Paper  *  Copic Sketch Markers (colours used listed below)  *  Scor-Pal 1/8 Scor Tape  *  Scor-Pal  *  Bazzill Basics Simply Smooth White Cardstock (for card Base & carousel)  * Squishy Scissors (for intricate cutting)  *  Quickie Glue Pen  *  Fairy Dust Glitter, Sugar Shimmer  *  Glue Dots  *  Marianne Design Card Carousel Die * Spellbinder Die - Blossoms Three  *  My Favorite Things Die-Namics - Flag Stax, Flag Stax Layers & Flower Trio  *  Sheer Ribbon * Pink Shimmer Card Stock  *  Patterened Papers:  MME 6x6 Pads - Love Me & Indie Chic Safron + Lost & Found 6x6 - Blush  *  Various Sentiments to match your theme  *  ATG  *

Directions:
* To start off you will need to cut out your card base, cut 2 @ 10-1/4 x 6 + 1 @ 6 x 5-1/8

* You will need to choose your paper(s) and cut 10 @ 5-3/8 x 4-3/8.  I chose 5 different co-ordinating papers and cut 2 of each.

*Choose 4 images and 4 sentiments + a cover sentiment or decorative- I also chose to put a "handmade by" stamp on the back of the card.  The reason I did not put an image on the front and chose a sentiment instead is because when the carousel is opened the front and back of the card is not seen.  Also I chose a Spellbinder set that co-ordinated with my images and also had a few different size selections that I used throughout the whole card for a uniform look (I am a little anal that way if you have not noticed)
 
*Next you will need to cut out 4 pieces of the Marianne Design Card Carousel Die - see picture below....

*Using your ScorPal, score where I have noted on the bottom right die cut in the picture above.
 
* Next I put my card 2 large pieces of the cardbase together on top of each other and the smaller piece in the center of the "book", then  I placed all my patterened papers on the the card bases in the order that I wanted them to be seen on the carousel.  Be sure to attach a piece of ribbon on the underside ofthe front andback pieces of paper so as to create the tie to close the card.
 
*Once you have on your papers, add your "flower"anchors where two pages of the book join to keep each page attached to each other (this step can been seen on each page showing an image below).
 
*Next you will want to add your sentiments and coloured images to all the remaining pages.  Dont forget to add a "Handmade by" on the back cover!
 
*Once you have all your indsides completed, add adhesive to the small scored tabs of the carousel die pieces and attach to each section of the insideofthe book.
 
Below I have pictures to show you of each completed step of my book!  Copic colours used on all images will be listed at the end of this post for your refference if interested.
 
*My outside cover using the wonderful sentiment from DoCrafts Wellington 8x8 Stamp Set....
 
*Below is page one & two of my book...

*Here is a close up of the High Hopes Sentiment that I used on page 1....

*Here is a close up of the Whimsey Wee Stamps Rosetta with a paper pieced vest, that I used on page 2.  I did 3D effect the larges flower as well...


*Below is page 3 & 4 of my book....

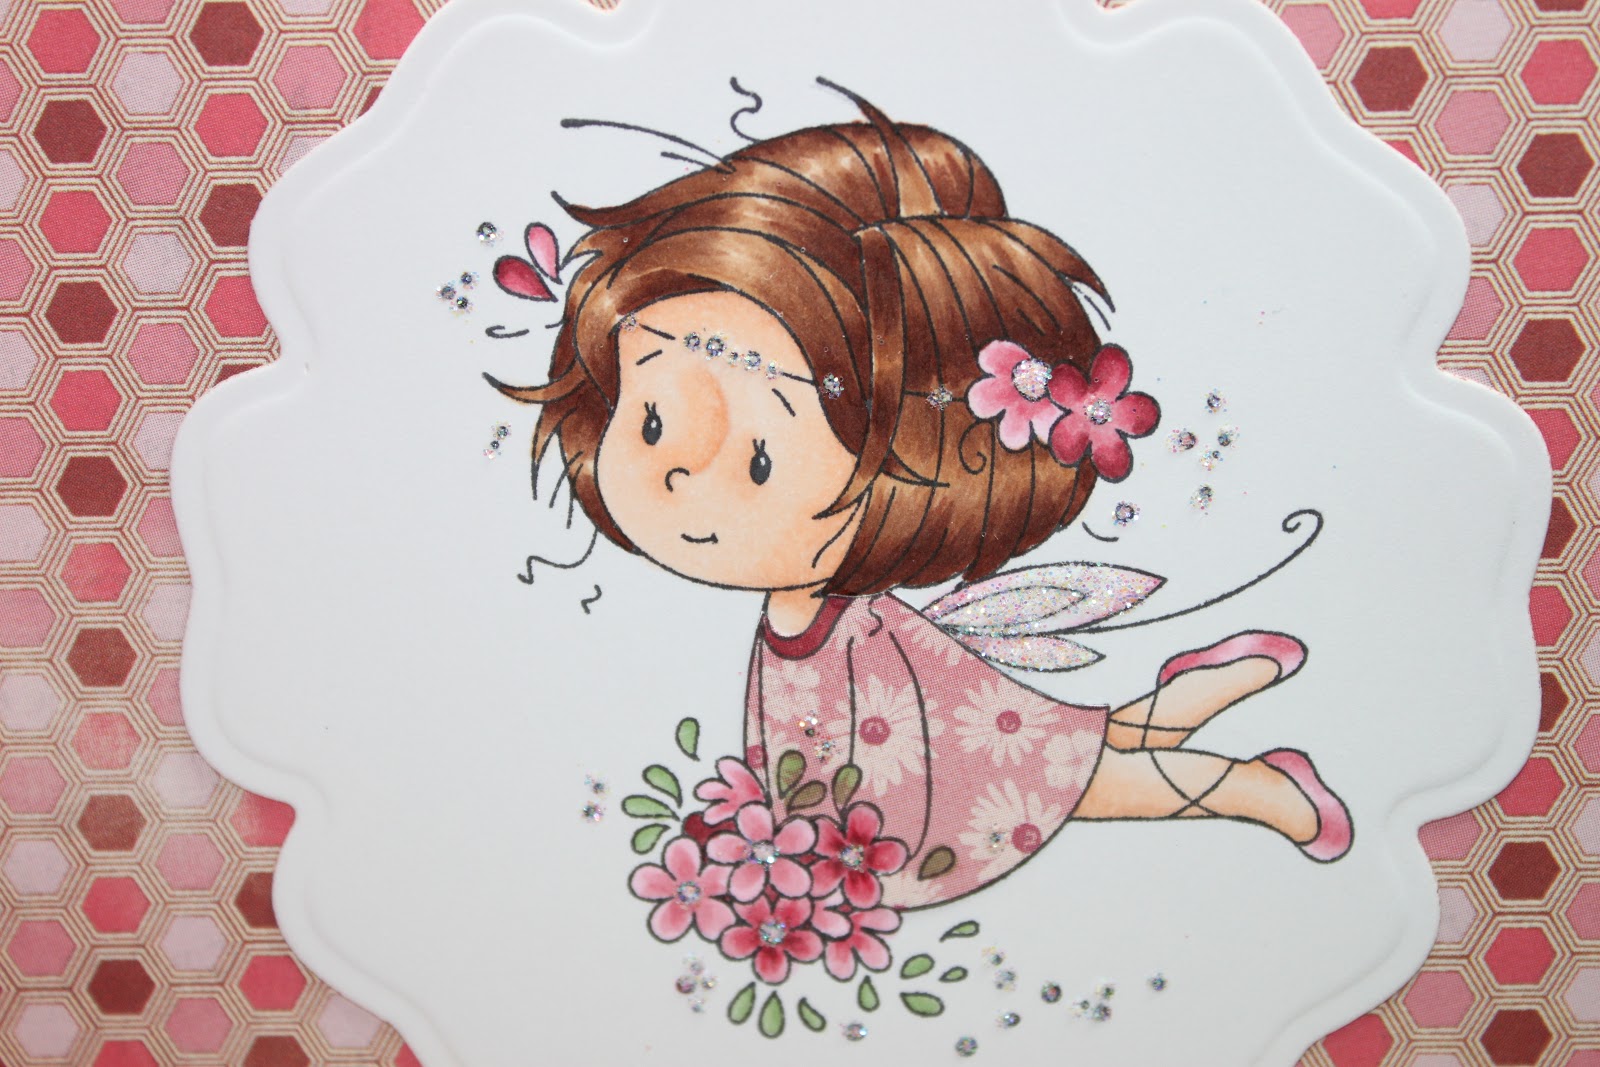
*Here is a close up of the Whimsey Wee Stamps Flower Fairies (#1) with a paper pieced dress, that I used on page 3....

*Here is a close up of the Your Next Stamp Whatnot Sentiment that I used on page 4....

*Below is page 5 & 6 of my book....

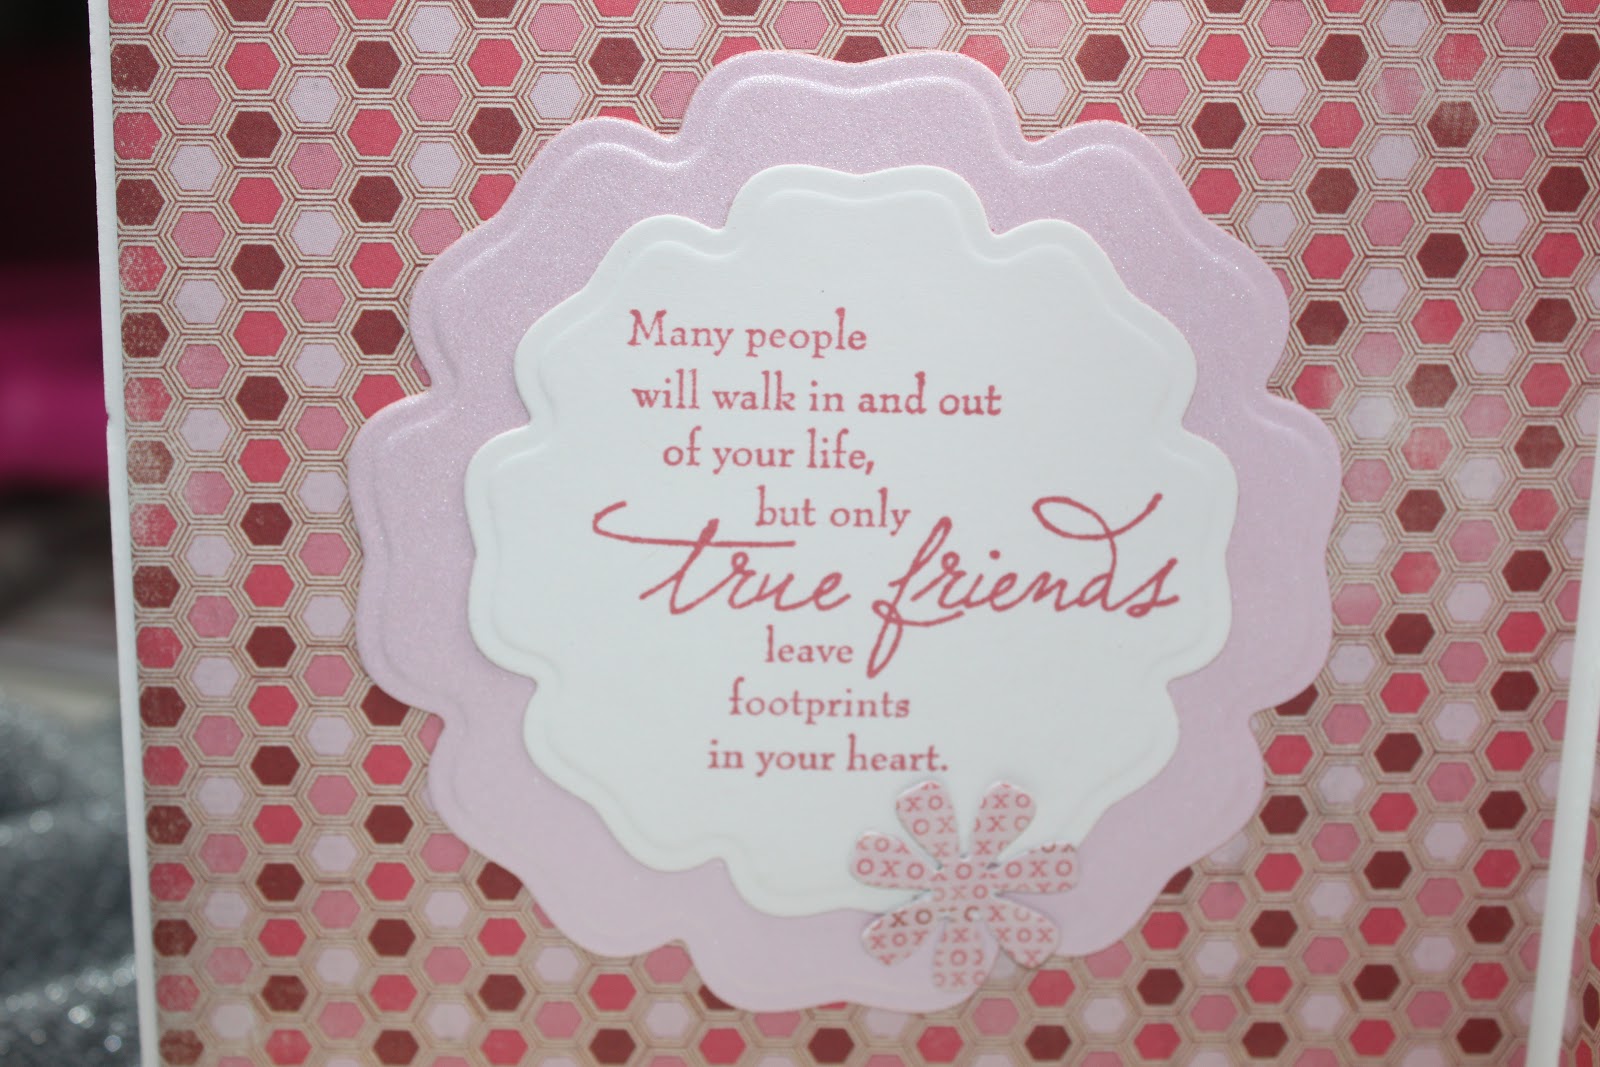
*Here is a close up of the Stampabilities True Friends Sentiment that I used on page 5....

*Here is a close up of the Whimsey Wee Stamps Flower Fairies (#2) with a paper pieced dress, that I used on page 6....
 
*Below is page 7 & 8 of my book....
 

*Here is a close up of the Whimsey Wee Stamps Ruby with a paper pieced vest, that I used on page 7....

*Here is a close up of the Your Next Stamp Whatnot Sentiment that I used on page 8 - this is also where I will write a little some thing to the recipient of the beautiful book/card....

*This is the back cover ofmy book that I decided to put a "Handmade By" sentiment to finish off the project.  Tie up the book with a pretty little bow and voila!...


*Here is a view of the book before it is tied into the carousel....

*Here is what the full carousel card looks like when opened and tied on the side - pictures sure do not do this justice so hope you get the jist of it....
Copic Colours used on all Images:  *Skin-E11, E00, E000 *Dark Hair-E49, 59, E25, E50  *Lighter Hair-E29, E27, E23, E50  *Pinks-R56, R85, R83, R81, RV10, RV000  *Greens-G24, G21, G20  *Other-E40, E23
 
Well, that is my tutorial I prepared for you, I hope that you will give it a try as I am sure you will see a few more of these on my blog in the future because they are soooo much fun to make!  I would sure love to hear your thoughts on this fun card if you have time =)
 
Until Next Time, Keep Crafting!
Hugs;